Environments
An Environment is an abstraction that dictates what clusters a workload should be deployed to.
Usually, you do not need to create or manage environments directly. When you create a compute pool, PaletteAI automatically creates an environment with a topology policy configured. This handles workload placement to the compute pool's clusters without additional setup.
This page is for advanced users who are bringing their own clusters (outside of Palette) to run workloads, or who need to customize environments beyond what compute pools provide.
Below is an example of an Environment that will deploy workloads to three spoke clusters. Teams could use this Environment to deploy Workloads to a set of clusters that they own or have assigned.
apiVersion: spectrocloud.com/v1beta1
kind: Environment
metadata:
  name: primary-east
  namespace: platform-eng-ns
spec:
  topology:
    type: topology-ocm
    properties:
      manifestWorkReplicaSet:
        manifestWorkTemplate:
          lifecycle:
            spokeNamespace:
              create: true
              orphan: false
            workload:
              orphan: false
        rolloutStrategy:
          all: {}
          type: All
      hubNamespace: managed-cluster-set-global
      placement:
        numberOfClusters: 3
        predicates:
          - requiredClusterSelector:
              labelSelector:
                matchLabels:
                  region: us-east-2
At a high level, an Environment works as follows:
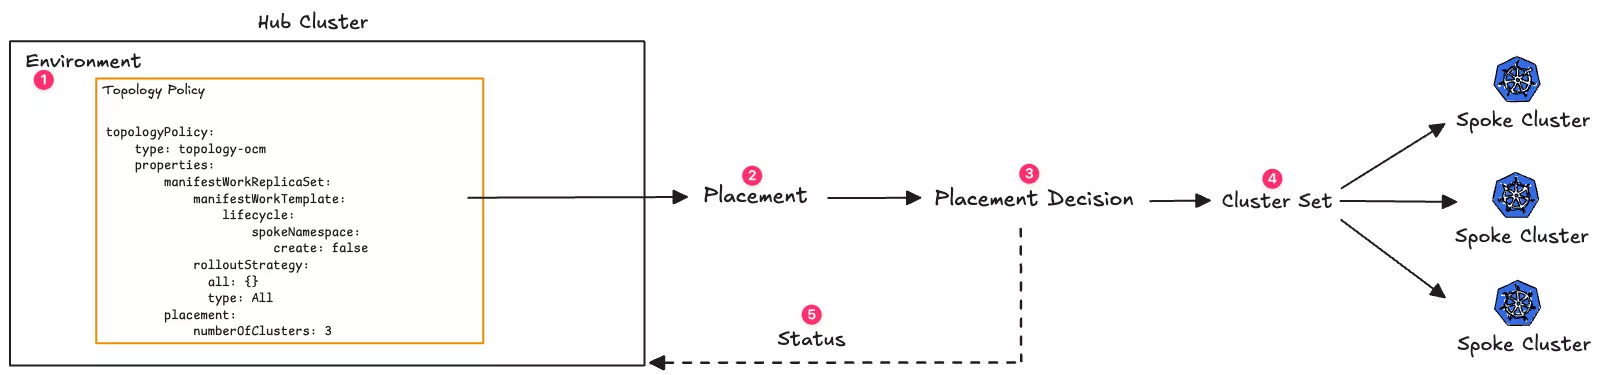
- An Environment that contains a topology defined in the hub cluster.
- The topology references or produces at least one Placement, an Open Cluster Management (OCM) resource that selects which clusters should receive a workload, depending on the topology Policy type.
- The Placement decision uses at least one cluster set to select the spoke clusters.
- Spoke clusters are part of a cluster set. A spoke cluster can be part of one or more cluster sets.
- The Placement decision is reconciled in the hub cluster and used to update the Environment's status.
Check out the Creating and Managing Environments page for more information on how to create and manage Environments. To better understand how Environments work, the following sections break down the different components that make up an Environment.
Topology
An Environment must have a topology that dictates Workload distribution to spoke clusters. An Environment can only contain one topology. During deployment, Workload replication and Placement are determined by topology, enabling application teams to become infrastructure agnostic.
A topology selects one or more target spoke clusters from the overall PaletteAI multi-cluster based on high-level business requirements such as latency, technological requirements such as GPU model, or arbitrary metadata such as labels.
More concretely, a topology is a CUE template that renders to Kubernetes resources or custom resources. The application of these resources to the PaletteAI hub cluster must result in the propagation of a Workload custom resource to one or more spoke clusters.
To facilitate writing topology policies, a custom key, workloadYamls, is available by default within PaletteAI's rendering context. Refer to the Rendering page for further information.
Available Topologies
By default, PaletteAI provides two topologies:
-
topology-ocm- A topology that uses Open Cluster Management (OCM) to distribute workloads. It creates aPlacementand aManifestWorkReplicaSetthat references thePlacement. By default, the Placement is created in themanaged-cluster-set-globalnamespace and uses theglobalManagedClusterSet, which causes it to select from all available spoke clusters. You may optionally override the placement namespace and cluster sets. -
topology-ocm-byop- A topology similar totopology-ocm, except that it allows you to reference one or more preexisting Placements in the hub cluster versus creating a newPlacementfor each Workload Deployment in a given Environment.
Placements
Placements are OCM resources that are responsible for multi-cluster scheduling. A Placement's responsibility is to select a set of spoke clusters that a Workload should be deployed to. Placements use managed clusters from a MangedClusterSet or potentially several MangedClusterSets to determine the set of spoke clusters to which a workload should be deployed.
If you use a topology-ocm topology, a Placement is created automatically when a Workload is deployed that targets all available spoke clusters. However, if you use a topology-ocm-byop topology, you must define a Placement manually in the hub cluster before you can use it in an Environment.
Placement Decisions
A Placement contains a list of PlacementDecision resources. Each PlacementDecision contains a list of spoke clusters that should receive the Workload. PlacementDecisions are automatically created by the Placements controller.
Lifecycle Settings
Lifecycle settings control how namespaces and Workloads are created and removed on spoke clusters. By default, when a WorkloadDeployment is deleted from the hub cluster, all resources it created are deleted from spoke clusters.
topology-ocm Lifecycle
The topology-ocm policy supports lifecycle configuration under manifestWorkReplicaSet.manifestWorkTemplate.lifecycle:
| Parameter | Description | Default |
|---|---|---|
spokeNamespace.create | Whether to create the Workload namespace on spoke clusters. If false, the namespace must already exist. | true |
spokeNamespace.orphan | Whether to retain the auto-created namespace when the WorkloadDeployment is deleted. Only applies if spokeNamespace.create is true. | false |
workload.orphan | Whether to retain the Workload on spoke clusters when the WorkloadDeployment is deleted. Retaining the Workload also retains its namespace regardless of spokeNamespace.orphan. | false |
If you manually created a Workload namespace on your spoke clusters and do not want PaletteAI to manage it, set spokeNamespace.create to false. Otherwise, PaletteAI assumes ownership of that namespace, which could lead to deletion when the WorkloadDeployment is removed.
Avoid creating auxiliary resources inside namespaces created by PaletteAI unless spokeNamespace.orphan is true.
topology-ocm-byop Lifecycle
The topology-ocm-byop policy does not support lifecycle parameters directly. Instead, configure ManifestWork Garbage Collection using deleteOption.
spec:
  topology:
    type: topology-ocm-byop
    properties:
      manifestWorkReplicaSet:
        manifestWorkTemplate:
          deleteOption:
            propagationPolicy: SelectivelyOrphan
            selectivelyOrphans:
              orphaningRules:
                - name: example-ns
                  resource: namespaces
The limitation with topology-ocm-byop is that you must specify resource names ahead of time in deleteOption, and you cannot dynamically create namespaces. Use topology-ocm if you need these capabilities, or author a custom topology policy.
Status
An Environment contains a status section that displays the status of the Environment. The Environment's EnvironmentReady status is either Ready or NotReady. The Environment uses the status reported back by the Placement to determine the status of the Environment.
An Environment is considered ready if the Placement decision contains at least one spoke cluster. However, if you specified a strategy that requires a specific number of clusters, the Environment will only be considered ready if the Placement decision contains at least the specified number of spoke clusters. If the Placement decision is empty, the Environment will be considered not ready.
The Environment's status does not guarantee that a Workload Deployment will succeed. The Environment status informs you that your Environment can accept a Workload Deployment and that at least one spoke cluster is available and ready.
To view the status of an Environment, use the following command. Replace <environment-name> and <namespace> with the name of the environment and the namespace it is deployed to.
kubectl get environment <environment-name> --namespace <namespace>
NAME      ENVIRONMENT READY
staging   Ready
In the event an Environment is not ready, you can check the status of the Environment to learn more. The Environment status will contain a message listing all the Placement decisions that failed. Review the Placement decision statuses to learn more about why the environment is not ready.
Below is an example of an Environment status that is not ready. The environment is not ready because the placement decision byop-placement in the devops-ns namespace failed. To improve readability, the output has been truncated.
....
Status:
  Conditions:
    Last Transition Time:  2025-04-15T16:46:57Z
    Reason:                Available
    Status:                True
    Type:                  FinalizerInitialized
    Last Transition Time:  2025-04-15T16:46:57Z
    Message:               failed to review placements: Placement.cluster.open-cluster-management.io "byop-placement" not found
failed to get placement byop-placement in namespace mural-system

    Reason:  TotalSelectedClustersLessThanZero
    Status:  False
    Type:    EnvironmentReady
  Selected Clusters:
  Status:                   NotReady
  Total Selected Clusters:  0
You can then use the following command to view the status of the Placement and learn more about why it failed. Replace <placement-name> and <namespace> with the name of the Placement and the namespace it is deployed to. To improve readability, the output has been truncated.
kubectl describe placement <placement-name> --namespace <namespace>
...
Status:
  Conditions:
    Last Transition Time:  2025-04-05T00:06:33Z
    Message:               Placement configurations check pass
    Reason:                Succeedconfigured
    Status:                False
    Type:                  PlacementMisconfigured
    Last Transition Time:  2025-04-05T00:06:33Z
    Message:               No valid ManagedClusterSetBindings found in placement namespace
    Reason:                NoManagedClusterSetBindings
    Status:                False
    Type:                  PlacementSatisfied
  Decision Groups:
    Cluster Count:         0
    Decision Group Index:  0
    Decision Group Name:
    Decisions:
      byop-placement-decision-1
In the failure scenario above, the Placement failed because no valid ManagedClusterSetBindings were found in the Placement namespace. This means that the Placement could not select any spoke clusters, as there is no list of spoke clusters from which to choose.
Policies
Environments can contain multiple policies. Policies are used to override behavior for Components or Traits in a Workload. PaletteAI comes with the override policy out of the box, which is used to override behavior for Components or Traits in a Workload.
Revisions
Environments are versioned via revisions, just like Components, Traits, Policies, and Workload Profiles. Whenever a new Environment is created, a revision is automatically created to store its entire metadata and spec. Whenever an Environment is edited, a new revision is created containing the latest environment content.
By default, Workload Deployments are automatically updated to use the latest revision of their referenced Environment. However, you may also pin the version of an environment referenced by a workload deployment.
Basic Versioning
Environment revisions are autoincrementing integers starting at 1. For example, when an Environment named my-env is first created, a v1 revision will be created. The next time the my-env Environment is edited, a v2 revision will be created, and so on.
A Workload Deployment can request the latest version of an environment as follows.
apiVersion: spectrocloud.com/v1beta1
kind: WorkloadDeployment
metadata:
  name: my-deployment
spec:
  environmentRef:
    name: my-env
    namespace: my-namespace
  # ... other fields
Alternatively, a Workload Deployment may request a specific revision of an Environment by adding @<revisionId> to the name.
apiVersion: spectrocloud.com/v1beta1
kind: WorkloadDeployment
metadata:
  name: my-deployment
spec:
  environmentRef:
    name: my-env@v1
    namespace: my-namespace
  # ... other fields
Semantic Versioning
Environments also support semantic versioning and version ranges. An Environment version may be pinned to a specific semantic version or to a particular semantic version range. Semantic versioning ensures consistency when deploying workloads into multiple PaletteAI Environments with potentially differing Environment revision histories.
To utilize semantic versioning, an Environment's spec.Version field must contain a valid semantic version. The Version field is optional. If unset, basic versioning will be used. A semantic version for an Environment may be specified in a WorkloadDeployment's spec.environmentRef.name field, just like basic versioning.
- If an Environment is pinned to a major version range, the latest major.minor.patch version having the same major version is used. For example, a Workload Deployment requesting
my-env@v1would ultimately usemy-env@v1.3.6if the Environmentmy-envhadspec.Versionset to1.3.6. - If an Environment is pinned to a major.minor version range, the latest major.minor.patch version having the same major and minor versions is used. For example, a Workload Deployment requesting
my-env@v1.3could also end up usingmy-env@v1.3.6. - If an Environment is pinned to a major.minor.patch version, that version will be used, unless it does not exist.
Complete Example
Below is a complete example of a Workload Deployment using an Environment and a Workload Profile. An Environment named primary is defined that uses the topology-ocm topology. Next, a Workload Profile is defined, which contains the Workload with the Components to be deployed. Finally, a Workload Deployment is defined that references the Environment and Workload Profile to deploy. The desired Workload name and namespace is also defined in the Workload Deployment. Additional annotations and labels are specified for both the Workload and the Workload namespace. This will lead to a Workload being federated to all selected spoke clusters.
apiVersion: spectrocloud.com/v1beta1
kind: Environment
metadata:
  name: primary
  namespace: hello-universe
spec:
  topology:
    type: topology-ocm
    properties:
      manifestWorkReplicaSet:
        manifestWorkTemplate:
          lifecycle:
            spokeNamespace:
              create: true
              orphan: false
            workload:
              orphan: false
        rolloutStrategy:
          all: {}
          type: All
      hubNamespace: managed-cluster-set-global
      placement:
        numberOfClusters: 1
---
apiVersion: spectrocloud.com/v1beta1
kind: WorkloadProfile
metadata:
  name: hello-universe-demo
  namespace: mural-system
spec:
  workload:
    components:
      - name: ui
        type: webservice
        properties:
          image: ghcr.io/spectrocloud/hello-universe:1.2.0
          port: 8080
          exposeType: ClusterIP
          labels:
            app: ui
        traits:
          - type: resources
            properties:
              cpu: '500m'
              memory: '500Mi'
              requests:
                cpu: '500m'
                memory: '500Mi'
---
apiVersion: spectrocloud.com/v1beta1
kind: WorkloadDeployment
metadata:
  name: hello-universe-demo
  namespace: hello-universe
spec:
  workload:
    name: my-workload
    namespace: hello-universe
    metadata:
      annotations:
        app.kubernetes.io/version: '1.0.0'
        deployment.kubernetes.io/revision: '1'
      labels:
        app: hello-universe
        environment: production
        team: frontend
    namespaceMetadata:
      annotations:
        scheduler.alpha.kubernetes.io/node-selector: 'kubernetes.io/os=linux'
        kubernetes.io/managed-by: 'mural'
      labels:
        project: hello-universe
        cost-center: engineering
        compliance: pci-dss
  workloadProfileRef:
    name: hello-universe-demo
    namespace: hello-universe
  environmentRef:
    name: primary@v1 # Pin to revision v1 of the environment
    namespace: hello-universe
In the example above, the environmentRef pins the Workload Deployment to revision v1 of the primary Environment using the @v1 syntax. This ensures the Workload Deployment uses that specific revision even if newer revisions of the Environment are created. To use the latest revision, omit the @v1 part from the Environment name.
For semantic versioning, use syntax such as primary@v1.2.0 to pin to a specific semantic version.