Create and Manage Workload Profiles
Workload profiles are reusable templates that define how an application should be configured, decoupling the modeling and deployment phases of the application lifecycle. You build workload profiles from definitions (components, traits, and policies) and use them when creating profile bundles and deploying applications and models with those profile bundles.
Create Workload Profiles
Create a new workload profile to define a reusable application, model, or infrastructure template.
Prerequisites
-
A user with project editor or admin permissions.
-
An existing project.
Enablement
-
Log in to PaletteAI.
-
From the left main menu, select Workload Profiles.
-
In the top-right, select New Profile. Alternately, beside an existing workload profile, select the three-dot menu, and choose Clone.
-
Enter the Basic Information for your workload profile. The available fields depend on whether your PaletteAI instance uses basic or semantic versioning. The following tables describe the fields for each mode. Select Next when finished.
infoVersioning mode is a system-wide setting configured during installation via the Helm value
global.featureFlags.versioningType. The default isbasic(v0, v1, ...). Set tosemanticfor semantic versioning (v0.0.1, v0.1.0, ...). Refer to Helm Chart Configuration for details.Basic Information
- Basic Versioning
- Semantic Versioning
Parameter Description Required Name A unique name for your workload profile within the project scope. Must start and end with alphanumeric characters, and can only contain lowercase letters, numbers, hyphens, and periods. ✅ Description A description for your workload profile. ❌ Profile Type The type of workload profile: Application, Model, or Infrastructure. Determines which profile bundles can include this workload profile. Refer to Workload Profile Types for details. ✅ New Revision The revision identifier. Automatically incremented and cannot be modified manually. ✅ Revision notes Notes describing what changed in this revision. ❌ Parameter Description Required Name A unique name for your workload profile within the project scope. Must start and end with alphanumeric characters, and can only contain lowercase letters, numbers, hyphens, and periods. ✅ Description A description for your workload profile. ❌ Profile Type The type of workload profile: Application, Model, or Infrastructure. Determines which profile bundles can include this workload profile. Refer to Workload Profile Types for details. ✅ Update type The type of version update. Choose from Patch, Minor, or Major. Determines how the version number is incremented. ✅ New version The new version number, auto-calculated based on the selected Update type. Cannot be modified manually. ✅ Version notes Notes describing what changed in this version. ❌ -
Use the Create Profile screen to build your workload profile stack using components, Helm charts, and traits. The profile stack is a visual representation of the layers that make up your AI/ML application or model.
Refer to the applicable section based on what you would like to add to your workload profile.
- Components
- Helm Charts (resolved as components)
- Traits
- Object Outputs
Drawer Actions
The following table describes the actions available for individual parts of the workload profile stack and which layers support each action. The numbers in the table correspond to the numbers in the image.
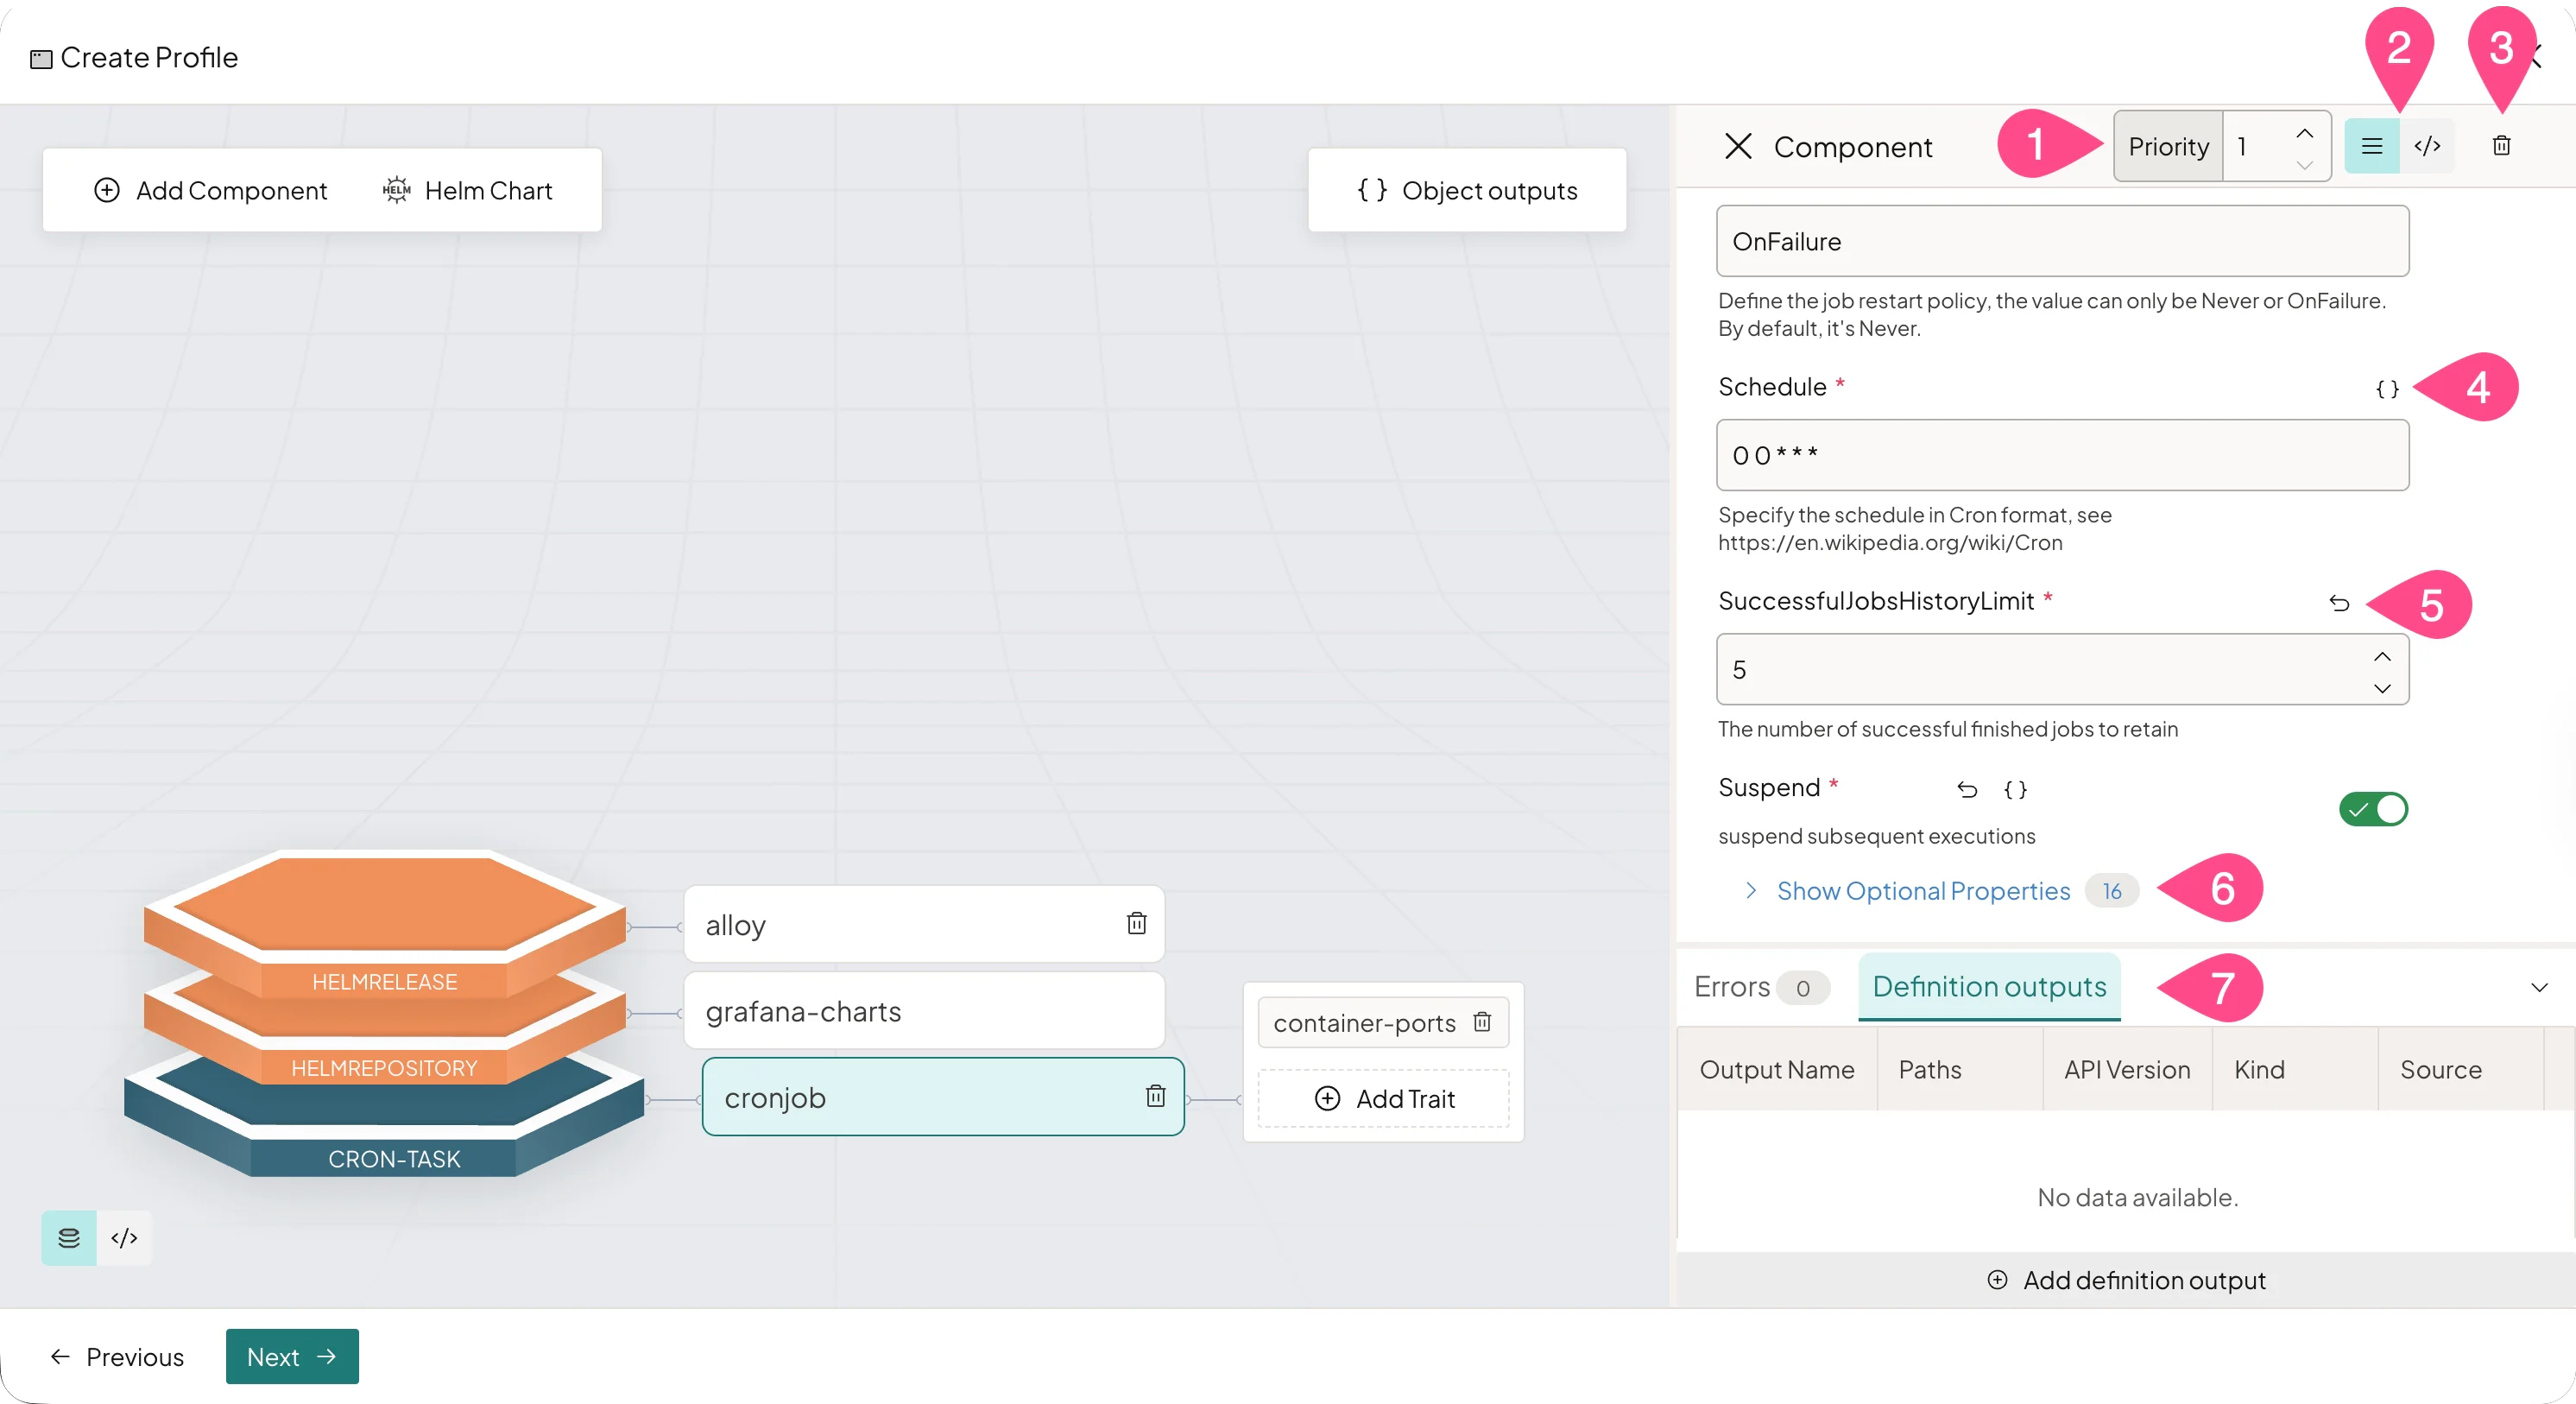
Number Option Description Components Traits 1 Priority Change the component's deployment priority. ✅ ❌ 2 Form and YAML editor Use the hamburger icon to complete information using the form editor. Use the </>icon to switch to the YAML editor.✅ ✅ 3 Trash icon Remove the selected component, Helm chart, or trait from the stack. ✅ ✅ 4 {}iconToggle macro mode to enter values using {{variable}}syntax. Macros can reference definition outputs, object outputs, system outputs, and user variables.✅ ✅ 5 Arrow icon Revert a field to its default value. Only available for certain fields. ✅ ✅ 6 Show Optional Properties Reveal additional, optional configurable fields. ✅ ✅ 7 Errors and Definition outputs View validation errors and add definition outputs as necessary. ✅ ✅ Add Components
Components are the main building blocks of your workload profile. Each component represents a discrete unit of your application, such as a web server or a worker process.
-
Select Add Component or a layer in the stack to open the Add Component dialog.
-
Browse for the component you want to add. Choose a component, version, and select Add Component.
tipUse the Show system definitions toggle to control which components are displayed. When enabled (the default), both system-provided and user-created components are shown. When disabled, only user-created components within your project scope are displayed, filtering out components in the
mural-systemnamespace. -
The component is added to the stack and a Component drawer opens for configuration. The drawer displays only required fields by default. Configure the component as necessary using the actions in the Drawer Actions table.
-
Close the drawer once all required fields have been configured.
Add Helm Charts
You can add Helm charts to your workload profile from Helm repositories or OCI repositories. When a Helm chart is added to a profile, it is automatically converted to a component.
- Select Helm Chart to open the Helm chart dialog. 6. Choose between the Helm Repositories and OCI Repositories tabs.
- Helm Repositories — Select a repository from the list, then choose a chart and version from the available options.
- OCI Repositories — Select a repository from the list. The chart name and version are automatically extracted from the repository's URL and reference (tag, semver, or digest).
- Select Add to add the chart. The chart's top-level items are added to the stack as components, and the Component drawer opens for configuration. Required and optional fields are automatically sorted, and default values are pulled in where applicable. Configure the component as necessary using the actions in the Drawer Actions table.
- Close the drawer once all required fields have been configured.
Add Traits
Traits modify how a component runs, such as scaling behavior or health checks. Traits are added per-component and are only visible when their parent component is selected in the stack.
-
Select a component in the stack.
-
Browse for the trait you want to add. Choose a trait, version, and select Add Trait.
tipThe trait selection modal also includes a Show system definitions toggle. When disabled, only user-created traits are shown.
-
The trait is added to the component and a Trait drawer opens for configuration. Configure the trait's required fields. Configure the trait as necessary using the actions in the Drawer Actions table.
-
Close the drawer once all required fields have been configured.
Add Object Outputs
Object outputs expose metadata from Kubernetes resources that exist outside the workload. 1
-
Select Object Outputs to open the Object Outputs drawer.
-
Select Add Object Output to open the form. Configure the following fields as necessary.
Parameter Description Required Output name A unique identifier for this output. ✅ Scope Whether the referenced resource is Cluster-scoped or Namespace-scoped. ✅ Namespace The namespace of the referenced resource. Only displayed when Scope is set to Namespace. ✅ API Version The apiVersionof the referenced Kubernetes resource.✅ Kind The kindof the referenced Kubernetes resource.✅ Resource Name The name of the referenced Kubernetes resource. ✅ Path A JSON path to a field under metadata,spec, orstatusof the referenced resource.✅ Skip Hash Whether to exclude this output from the workload hash. Defaults to false. ❌ Deployment Priority Assign the output to a specific deployment priority, or leave unset. Unscoped outputs are resolved only after the final priority is processed. ❌ -
Select Add to save the object output.
-
Use the Add Object Output button to add additional outputs as needed. Close the drawer when finished.
-
Add as many components, Helm charts, traits, and object outputs as necessary. Once you have finished building your profile stack, select Next.
-
On the Review screen, verify and finalize your workload profile configuration. If changes are needed, use the step navigation on the left to return to the applicable screen. When satisfied, select Save Profile.
Validate
-
Log in to PaletteAI.
-
From the left main menu, select Workload Profiles.
-
Verify your new workload profile is listed in the table. The columns display the profile name, type, description, and latest revision or version.
Edit Workload Profiles
Edit an existing workload profile by creating a new version or revision. Each edit preserves the previous version, enabling you to track changes over time.
If a workload profile is part of a profile bundle, you can edit your profile bundle use the updated version of your workload profile.
Prerequisites
-
A user with project editor or admin permissions.
-
An existing workload profile.
Enablement
-
Log in to PaletteAI.
-
From the left main menu, select Workload Profiles.
-
Locate the workload profile you want to edit. Select the three-dot menu and choose View Details.
-
On the profile detail page, you can review the profile's configuration in a read-only view. Use the version drop-down in the breadcrumb to switch between existing versions.
-
Select Create Version (semantic versioning) or Create Revision (basic versioning) to open the edit wizard.
-
Update the Basic Information as needed. When editing, the Name and Profile Type fields are read-only. You can modify the Description, version notes, and (if semantic versioning is enabled) the Update type. Refer to the Basic Information table for additional details. Select Next when finished.
-
On the Create Profile screen, modify the workload profile stack as needed. You can:
- Add, remove, or reconfigure components and traits
- Add or remove Helm charts
- Add, edit, or remove object outputs and definition outputs
- Modify field values, deployment priorities, and macro references
Refer to the drawer actions table and applicable component, Helm chart, trait, and object output section for additional details.
Select Next when finished.
-
On the Review screen, verify your changes. Update Annotations and Labels as needed.
-
Select Save Profile to save the new version.
Validate
-
Log in to PaletteAI.
-
From the left main menu, select Workload Profiles.
-
Verify the workload profile's Latest revision or Latest version column reflects the new version number.
Delete Workload Profiles
Remove a workload profile that is no longer needed. Deletion is permanent and cannot be undone.
Prerequisites
-
A user with project editor or admin permissions.
-
An existing workload profile.
Enablement
-
Log in to PaletteAI.
-
From the left main menu, select Workload Profiles.
-
Locate the workload profile you want to delete. Select the three-dot menu and choose Delete. The workload profile is deleted immediately.
Validate
-
Log in to PaletteAI.
-
From the left main menu, select Workload Profiles.
-
Verify the workload profile is no longer listed in the table.
Next Steps
Once you have a workload profile, you can use it to create a profile bundle to deploy an AI/ML application or model.