Install PaletteAI on GKE with Gateway API
This guide covers installing PaletteAI on GKE using the Kubernetes Gateway API to expose the Canvas and Dex services instead of a Kubernetes Ingress. The Gateway API is the successor to the Ingress API and separates infrastructure concerns (the Gateway) from routing concerns (HTTPRoute resources). If you prefer the GKE Ingress controller, follow the Install PaletteAI on GKE guide instead.
The deployment uses the hub-as-spoke pattern with Zot as the Open Container Initiative (OCI) registry.
With this approach, the PaletteAI Helm chart does not create any Ingress resources. After the Helm installation, you create a GKE Gateway, HTTPRoute, and HealthCheckPolicy resources that route external traffic to the Canvas and Dex services.
Prerequisites
-
Use a Kubernetes cluster as the PaletteAI hub.
-
Access to the hub cluster using the built-in Kubernetes
cluster-adminClusterRole. -
Minimum Kubernetes versions
Cluster Type Kubernetes Version Hub >= 1.31.0 Spoke >= 1.31.0 -
Minimum resource requests
Cluster Type CPU Memory Storage Hub 3388m 2732 Mi 10Gi Spoke 1216m 972 Mi 10Gi -
Ensure the hub cluster can reach the public AWS Elastic Container Registry (ECR) that hosts the
muralandmural-crdscharts. -
Access to the hub cluster
kubeconfigfile. -
Install Flux controllers on the hub cluster if you plan to use the recommended Flux-managed workflow.
-
Install the following tools on the machine you use to install or upgrade PaletteAI:
-
Configure the hub cluster Kubernetes API server to trust Dex as an identity provider. PaletteAI deploys Dex as part of the installation. This requirement applies only to the hub cluster, not to spoke clusters. For details, refer to Configure Kubernetes API Server to Trust OpenID Connect (OIDC) Provider.
-
By default, PaletteAI is configured to terminate HTTPS at the load balancer. To enable this behavior you need:
-
A domain name available for PaletteAI.
-
The HttpLoadBalancing add-on enabled on the GKE cluster.
-
An optional static external IP address for the load balancer.
infoPaletteAI communicates internally over HTTPS. Refer to our Security page for a detailed explanation of the security architecture.
-
-
PaletteAI uses Dex as an OIDC provider. Dex provides a number of connectors to allow users to log in to PaletteAI using their existing identity provider. To enable Google Workspace as an OIDC provider for Dex, you must configure a Google Service Account, export a JSON key, and create a Kubernetes Secret containing the JSON key in the same namespace that PaletteAI will be installed. For detailed instructions, refer to the Dex documentation.
Once you download the JSON key, issue the following command to create a Kubernetes Secret containing the JSON key in the same namespace that Mural will be installed.
# create the namespace that Mural will be installed in, if it doesn't exist
kubectl create namespace mural-system

# create the secret containing the JSON key
kubectl create secret generic mural-google-service-account --from-file=googleAuth.json=/path/to/googleAuth.json --namespace mural-system -
To deploy PaletteAI with dedicated GKE spoke clusters, you must configure additional ClusterRoles and ClusterRoleBindings on each spoke. These permissions allow the hub's FleetConfig controller to bootstrap Open Cluster Management (OCM) components on the spoke clusters. Refer to the GKE Spoke Setup guide before proceeding.
-
The Gateway API enabled on your GKE cluster. GKE Autopilot clusters have the Gateway API enabled by default. For GKE Standard clusters, enable it with the following command.
gcloud container clusters update <cluster-name> --location <location> --gateway-api standardVerify that the GKE
GatewayClassresources are available on the cluster.kubectl get gatewayclassThis guide uses the
gke-l7-global-external-managedclass, which provisions a global external Application Load Balancer. If you prefer a regional external Application Load Balancer, use thegke-l7-regional-external-managedclass, which requires a proxy-only subnet in the same region as the load balancer. -
A TLS certificate for your PaletteAI domain. You can reference a Kubernetes Secret of type
kubernetes.io/tlsfrom theGateway, or use a Certificate Manager certificate map. This guide uses a Kubernetes Secret.
Enablement
-
-
Download the latest Helm chart values file. This example uses
curl.curl --output values.yaml --silent https://docs.palette-ai.com/resources/assets/hosted/helm/values.yaml -
Open the Helm chart values file in a text editor of your choice and complete the following sections. This example uses
vi.vi values.yaml
Global
-
-
Use the
globalsection to configure overarching settings for the PaletteAI deployment. Review and modify the following values as necessary.-
Set
global.dns.domainto the primary domain for the deployment. Do not include a protocol. For example, useexample.org, nothttps://example.org.global:
dns:
domain: 'example.acme.org' -
(Optional) To override the default Alertmanager credentials, configure
global.auditLogging.basicAuth. The Helm chart automatically generates credentials for the Alertmanager instance that receives audit events and stores them in themural-audit-basic-authSecret. You only need to set these values if you want to use custom credentials instead of the auto-generated ones.global:
auditLogging:
basicAuth:
username: '<your-username>'
password: '<your-password>'Refer to Audit Logging to learn more about configuring audit logging, querying audit events, and forwarding logs to long-term storage.
-
Configure the metrics collection settings. Provide an existing, external Prometheus server that is reachable from the hub cluster and every spoke cluster. Spoke clusters use Prometheus agents to ship metrics to the server via
remote_write.Set
global.metrics.prometheusBaseUrlto the external Prometheus server URL (for example,https://your-external-prometheus:9090). Include only the protocol, host, and port — do not include any API paths.global:
metrics:
prometheusBaseUrl: 'https://your-external-prometheus:9090'
timeout: '5s'
scrapeInterval: '15s'
agentType: 'prometheus-agent-minimal'
username: ''
password: ''By default,
global.metrics.agentTypeis set toprometheus-agent-minimal. The minimal agent configuration only collects spoke cluster CPU and GPU utilization metrics. You may changeglobal.metrics.agentTypetoprometheus-agentto ship all node-exporter and dcgm-exporter metrics from spoke clusters for comprehensive observability.If your Prometheus server requires basic authentication, configure the
usernameandpasswordfields. Leave these fields blank if authentication is not required.Refer to Configure Prometheus Agent Monitoring for guidance on agent types, Prometheus and Grafana prerequisites, and GPU metrics.
tipIf you need to set up a Prometheus server, you may find the Deploy Monitoring Stack guide helpful.
-
Set
global.instanceNameto a stable identifier for this PaletteAI installation (for example, an environment or tenant name). It is used to uniquely identify metrics related to this PaletteAI installation and to name the singletonSystemCR that carries system-scope configuration.global:
instanceName: 'prod-paletteai-east'warningIf
global.instanceNameis left unset, PaletteAI defaults topai-system. Metrics from this installation will publish underpaletteai_instance="pai-system", so multiple unnamed installations pointing at the same Prometheus become indistinguishable. Set a unique value per installation.Refer to Configure Prometheus Agent Monitoring for more detail.
Set
global.kubernetesProvidertoGKE-Ingress.global:
kubernetesProvider: GKE-IngressComplete
globalconfiguration section
infoThe
GKE-Ingressprovider value configures the fleetconfig-controller with a custom image that includes thegke-gcloud-auth-plugin, which is used to authenticate to GKE clusters. As a side effect, the chart creates aManagedCertificateand twoBackendConfigresources, and annotates the Canvas service with acloud.google.com/backend-configreference. These resources apply only to the GKE Ingress controller; the Gateway API does not use them, and they remain idle in this deployment model. -
-
Disable the root ingress. The root ingress requires Traefik, which this guide disables. You configure an equivalent root redirect with an
HTTPRouterule after the installation.global:
dns:
rootIngress:
enabled: falseFleetConfig
-
To configure a GKE FleetConfig, update the following parameters in the
fleetConfigsection of your Helm chart.Parameter Description hub.apiServerThe hub cluster's externally reachable API server endpoint, found in the hub cluster's kubeconfig file. Required for dedicated spoke clusters. The endpoint must be an address that the spoke clusters can reach over the network. spokes[i].klusterlet.forceInternalEndpointLookupDictates if the internal endpoint is looked up via the cluster-info ConfigMapinstead of the hub cluster's public API server endpoint.warningDo not change the
spokes[i].name: hub-as-spokevalue if using the hub-as-spoke pattern when installing PaletteAI.fleetConfig:
hub:
# The hub cluster's externally reachable API server endpoint. Required for dedicated spoke clusters.
apiServer: "https://<public-ip>:<port>"
spokes:
- name: hub-as-spoke # do not edit this name if you are using the default hub-as-spoke mode
klusterlet:
forceInternalEndpointLookup: falsewarningFor a dedicated hub with separate spoke clusters, set
fleetConfig.hub.apiServerto the hub cluster's externally reachable endpoint. If you leave this value unset, the hub advertises its in-cluster address, such as10.96.0.1, to the spoke clusters. External spoke clusters cannot reach that address, so registration fails. The hub's own hub-as-spoke registration still succeeds, which can hide the problem until you register the first external spoke cluster.This is the minimal configuration required to install a hub-as-spoke
FleetConfigfor GKE. If you are using a dedicated hub with separate spoke clusters, follow the additional spoke registration steps in the FleetConfig section of the Install PaletteAI on GKE guide. Those steps apply to Gateway API deployments without changes.Alertmanager
-
The audit basic-auth credentials are auto-generated and managed by the chart. For further instructions on accessing audit logs and configuring long-term storage, refer to Audit Logging.
Canvas
-
Keep
canvas.ingress.enabledset tofalse. TheHTTPRouteyou create after the installation exposes Canvas, so the chart does not need to create an Ingress resource.canvas:
ingress:
enabled: false -
Set
canvas.enableHTTPtotrue. This starts an HTTP listener on port2999and adds the port to the Canvas service, which lets the load balancer terminate Transport Layer Security (TLS) and forward plain HTTP traffic to Canvas.canvas:
enableHTTP: true -
The last portion of the Canvas configuration is the OIDC configuration. If you defer configuring OIDC for Dex, you may do the same for Canvas and configure it later.
In the
canvas.oidcsection, enter a unique string for thesessionSecret. ForredirectURL, replace<your-domain>with your domain. Do not remove the/ai/callbackpath.canvas:
oidc:
sessionSecret: '<your-session-secret>'
sessionDir: '/app/sessions'
issuerK8sService: 'https://dex.mural-system.svc.cluster.local:5554/dex'
skipSSLCertificateVerification: true
redirectURL: 'https://<your-domain>/ai/callback'
extraScopes:
- federated:idIf you did not configure your Kubernetes cluster to trust Dex as an OIDC provider, then you must configure the
canvas.impersonationProxysection to enable user impersonation.The example below shows how to configure the local Dex user
admin@example.comto be mapped to an example Kubernetes groupadmin. Refer to our Configure User Impersonation guide for details on configuring user impersonation for OIDC groups and other use cases. If you assign Tenant admin groups through the UI, you'll also need to add matchinggroupMapentries that map each IdP group name to the canonicalpai:tenant:…string on the Tenant. Refer to Map Tenant Admin IdP Groups to Canonical Kubernetes Groups for the steps.Example user impersonation setupcanvas:
impersonationProxy:
enabled: true
userMode: 'passthrough'
groupsMode: 'map'
userMap: {}
groupMap: {}
dexGroupMap:
'admin@example.com': [ 'admin' ]Complete
canvasconfiguration sectionDex
-
Dex authenticates users to PaletteAI through SSO. Configure the
dexsection of thevalues.yamlfile by following the steps in the Dex section of the Install PaletteAI on GKE guide, with the following two differences.-
Skip the step that adds the
cloud.google.com/backend-configannotation to the Dex service. The annotation references aBackendConfig, which applies only to the GKE Ingress controller. With the Gateway API, aHealthCheckPolicyconfigures the Dex health checks instead. You create it after the installation. -
Keep
dex.ingress.enabledset tofalse. TheHTTPRouteyou create after the installation exposes Dex.dex:
ingress:
enabled: false
Flux2
-
-
Set
flux2.policies.createtofalseto disable the Flux network policies. These policies, if enabled, prevent ingress traffic from reaching their target services.flux2:
policies:
create: falseinfoThis step is not required if the hub and all spoke clusters are configured to use a common, external OCI registry. An external OCI registry is configured in the
fleetConfig.spokes[*].ociRegistryandhue.ociRegistrysections of thevalues.yamlfile.Complete
flux2configuration sectionTraefik
-
Disable
traefik. The Gateway API replaces Traefik as the entry point for external traffic.traefik:
enabled: falseZot
-
The chart default uses Mural-managed ingress for
/zotwith Traefik StripPrefix middleware (zot.ingress.enabled: false,zot.ingress.subpathIngress.enabled: true). Enablezot.ingress.domainProxyif tools need/v2on the same host (for example Flux source-controller).-
Use the following pattern so a single load balancer can serve Canvas, Dex, and Zot under your domain:
zot:
  ingress:
    enabled: false
    className: "traefik"
    pathtype: ImplementationSpecific
    annotations: {}
    hosts:
      - host: my.domain.com
        paths:
          - path: /zot
            pathType: ImplementationSpecific
    subpathIngress:
      enabled: true
      matchAllHosts: false
    domainProxy:
      enabled: true
annotations: {} -
For
zot.ingress.hosts[i].host, use the same domain asglobal.dns.domain. -
Set
zot.httpGet.schemetoHTTPso the HTTP probe matches in-cluster traffic.zot:
httpGet:
scheme: HTTPTogether, these configurations use one external load balancer (Traefik). Subpath routing sends
https://my.domain.com/zot/...to Zot with the/zotprefix removed. WhendomainProxyis enabled,https://my.domain.com/v2andhttps://my.domain.com/v2/*also reach Zot so the registry owns the/v2route on that host. -
In
zot.configFiles.config.json, omit in-pod TLS when TLS terminates at the load balancer.zot:
configFiles:
config.json: |-
{
"storage": { "rootDirectory": "/var/lib/registry" },
"http": { "address": "0.0.0.0", "port": "5000","auth": { "failDelay": 5, "htpasswd": { "path": "/secret/htpasswd" } } },
"extensions": {"search": {"enable": true}, "ui": {"enable": false}},
"log": { "level": "debug" }
} -
To add registry users, extend
zot.secretFiles.htpasswd(bcrypt hashes).zot:
secretFiles:
htpasswd: |-
admin:$2y$05$vmiurPmJvHylk78HHFWuruFFVePlit9rZWGA/FbZfTEmNRneGJtha
user:$2y$05$L86zqQDfH5y445dcMlwu6uHv.oXFgT6AiJCwpv3ehr7idc0rI3S2G
If the recommended configuration will not work in your environment, you may set
zot.service.type: LoadBalancerandzot.ingress.enabled: false. Note that this will require an additional load balancer and an additional DNS A or CNAME record. The DNS record can be configured after the Helm installation; however, you must pre-configure the following fields to use the correct DNS name:-
fleetConfig.spokes[i].ociRegistry.endpoint -
fleetConfig.spokeValuesOverrides.hue.ociRegistry.endpoint -
hue.ociRegistry.endpoint
tipIf you use a dedicated load balancer for Zot and terminate TLS inside your cluster, the endpoint must include a
:5000suffix when provided to other services that need the registry endpoint (e.g.,oci://zot.my.domain.com:5000).Complete
zotconfiguration sectioninfoThe Traefik-based subpath routing described in this section is not available in this deployment model because Traefik is disabled. Use the
zot.service.type: LoadBalanceralternative described at the end of the section, which exposes Zot through a dedicated load balancer and DNS record.Helm Install
-
-
Install PaletteAI with Flux to let Flux manage chart ordering and the Custom Resource Definition (CRD) lifecycle for both Helm charts.
-
Create
mural-crds-oci-repository.yamlfor themural-crdschart.cat << EOF > mural-crds-oci-repository.yaml
apiVersion: source.toolkit.fluxcd.io/v1
kind: OCIRepository
metadata:
name: mural-crds
namespace: mural-system
spec:
interval: 10m
ref:
semver: "0.7.26"
url: oci://public.ecr.aws/mural/mural-crds
EOF -
Create
mural-oci-repository.yamlfor themuralchart.cat << EOF > mural-oci-repository.yaml
apiVersion: source.toolkit.fluxcd.io/v1
kind: OCIRepository
metadata:
name: mural
namespace: mural-system
spec:
interval: 10m
ref:
semver: "1.4.0"
url: oci://public.ecr.aws/mural/mural
EOF -
Apply both
OCIRepositoryresources to your cluster.kubectl apply --filename mural-crds-oci-repository.yaml
kubectl apply --filename mural-oci-repository.yaml -
Create
mural-crds-helm-release.yamlfor themural-crdschart.cat <<'EOF' > mural-crds-helm-release.yaml
apiVersion: helm.toolkit.fluxcd.io/v2
kind: HelmRelease
metadata:
name: mural-crds
namespace: mural-system
spec:
interval: 10m
chartRef:
kind: OCIRepository
name: mural-crds
namespace: mural-system
install:
crds: Create
upgrade:
crds: CreateReplace
EOF -
Create
mural-helm-release.yamlfor themuralchart. ThedependsOnfield ensures that Flux installsmural-crdsbeforemural.cat <<'EOF' > mural-helm-release.yaml
apiVersion: helm.toolkit.fluxcd.io/v2
kind: HelmRelease
metadata:
name: mural
namespace: mural-system
spec:
interval: 10m
chartRef:
kind: OCIRepository
name: mural
namespace: mural-system
dependsOn:
- name: mural-crds
values:
# Paste the contents of your values.yaml file here.
EOF -
Open
mural-helm-release.yamland replace the placeholder comment underspec.valueswith the contents of thevalues.yamlfile for your environment. Keep the inserted YAML indented underspec.values. -
Apply both
HelmReleaseresources to your cluster.kubectl apply --filename mural-crds-helm-release.yaml
kubectl apply --filename mural-helm-release.yaml
Install with Helm
warningIf you do not use Flux, manage the
mural-crdschart separately from themuralchart. Apply or upgrade Custom Resource Definitions (CRDs) out of band before you install or upgrade themuralchart. For the manual Helm workflow, refer to Upgrade Manually.-
Install the
mural-crdsHelm chart first.helm install mural-crds oci://public.ecr.aws/mural/mural-crds --version 0.7.26 \
--namespace mural-system --create-namespace --waitExample OutputNAME: mural-crds
LAST DEPLOYED: Tue May 27 09:34:33 2025
NAMESPACE: mural-system
STATUS: deployed
REVISION: 1 -
Install PaletteAI from the
muralchart by using your environment'svalues.yamlfile.helm install mural oci://public.ecr.aws/mural/mural --version 1.4.0 \
--namespace mural-system --create-namespace --values values.yaml --waitExample OutputNAME: mural
LAST DEPLOYED: Tue May 27 09:39:48 2025
NAMESPACE: mural-system
STATUS: deployed
REVISION: 1
Gateway and HTTPRoute Resources
With PaletteAI installed, create the Gateway API resources that expose Canvas and Dex.
-
-
Create a Kubernetes Secret containing the TLS certificate and private key for your domain. Skip this step if you are using a Certificate Manager certificate map.
kubectl create secret tls mural-tls \
  --cert /path/to/tls.crt \
  --key /path/to/tls.key \
--namespace mural-system -
Create a file named
gateway.yamlwith the following content. TheGatewayprovisions a global external Application Load Balancer with an HTTPS listener that terminates TLS using the secret created in the previous step, plus an HTTP listener used only to redirect traffic to HTTPS.apiVersion: gateway.networking.k8s.io/v1
kind: Gateway
metadata:
name: mural-gateway
namespace: mural-system
spec:
gatewayClassName: gke-l7-global-external-managed
listeners:
- name: https
protocol: HTTPS
port: 443
tls:
mode: Terminate
certificateRefs:
- name: mural-tls
- name: http
protocol: HTTP
port: 80Optionally, to use a reserved global static external IP address, add an
addressessection to theGatewayspec. Refer to Deploying Gateways for details.spec:
addresses:
- type: NamedAddress
value: <static-ip-name> -
Create a file named
httproutes.yamlwith the following content. Replacereplace.with.your.domainwith your domain. The first route sends/aitraffic to the Canvas service on port2999and redirects requests for the domain root to/ai. The second route sends/dextraffic to the Dex service on port5556. The third route redirects all HTTP traffic to HTTPS.apiVersion: gateway.networking.k8s.io/v1
kind: HTTPRoute
metadata:
name: canvas
namespace: mural-system
spec:
parentRefs:
- name: mural-gateway
sectionName: https
hostnames:
- replace.with.your.domain
rules:
- matches:
- path:
type: PathPrefix
value: /ai
backendRefs:
- name: canvas
port: 2999
- matches:
- path:
type: Exact
value: /
filters:
- type: RequestRedirect
requestRedirect:
path:
type: ReplaceFullPath
replaceFullPath: /ai
statusCode: 302
---
apiVersion: gateway.networking.k8s.io/v1
kind: HTTPRoute
metadata:
name: dex
namespace: mural-system
spec:
parentRefs:
- name: mural-gateway
sectionName: https
hostnames:
- replace.with.your.domain
rules:
- matches:
- path:
type: PathPrefix
value: /dex
backendRefs:
- name: dex
port: 5556
---
apiVersion: gateway.networking.k8s.io/v1
kind: HTTPRoute
metadata:
name: http-to-https-redirect
namespace: mural-system
spec:
parentRefs:
- name: mural-gateway
sectionName: http
rules:
- filters:
- type: RequestRedirect
requestRedirect:
scheme: https -
Create a file named
healthcheckpolicies.yamlwith the following content. By default, GKE load balancer health checks probe the/path, which does not return a success status for Canvas or Dex. These HealthCheckPolicy resources point the health checks at the dedicated health endpoints:/healthzon the Canvas HTTP port2999, and/healthz/liveon the Dex telemetry port5558.apiVersion: networking.gke.io/v1
kind: HealthCheckPolicy
metadata:
name: canvas
namespace: mural-system
spec:
default:
checkIntervalSec: 10
timeoutSec: 5
healthyThreshold: 2
unhealthyThreshold: 2
config:
type: HTTP
httpHealthCheck:
port: 2999
requestPath: /healthz
targetRef:
group: ''
kind: Service
name: canvas
---
apiVersion: networking.gke.io/v1
kind: HealthCheckPolicy
metadata:
name: dex
namespace: mural-system
spec:
default:
checkIntervalSec: 10
timeoutSec: 5
healthyThreshold: 2
unhealthyThreshold: 2
config:
type: HTTP
httpHealthCheck:
port: 5558
requestPath: /healthz/live
targetRef:
group: ''
kind: Service
name: dex -
Apply the resources to the cluster.
kubectl apply --filename gateway.yaml
kubectl apply --filename httproutes.yaml
kubectl apply --filename healthcheckpolicies.yaml
It may take several minutes for GKE to provision the load balancer.
DNS Setup
-
Once GKE provisions the load balancer, get the IP address assigned to the
Gateway.kubectl get gateway mural-gateway --namespace mural-systemExample outputNAME CLASS ADDRESS PROGRAMMED AGE
mural-gateway gke-l7-global-external-managed YOUR_IP True 10m -
Create a DNS record for the
ADDRESSload balancer IP. If you are using Cloud DNS, create an A record in your domain's hosted zone and select the load balancer as the target. Refer to Configure Cloud DNS alias record for your target DNS for more information.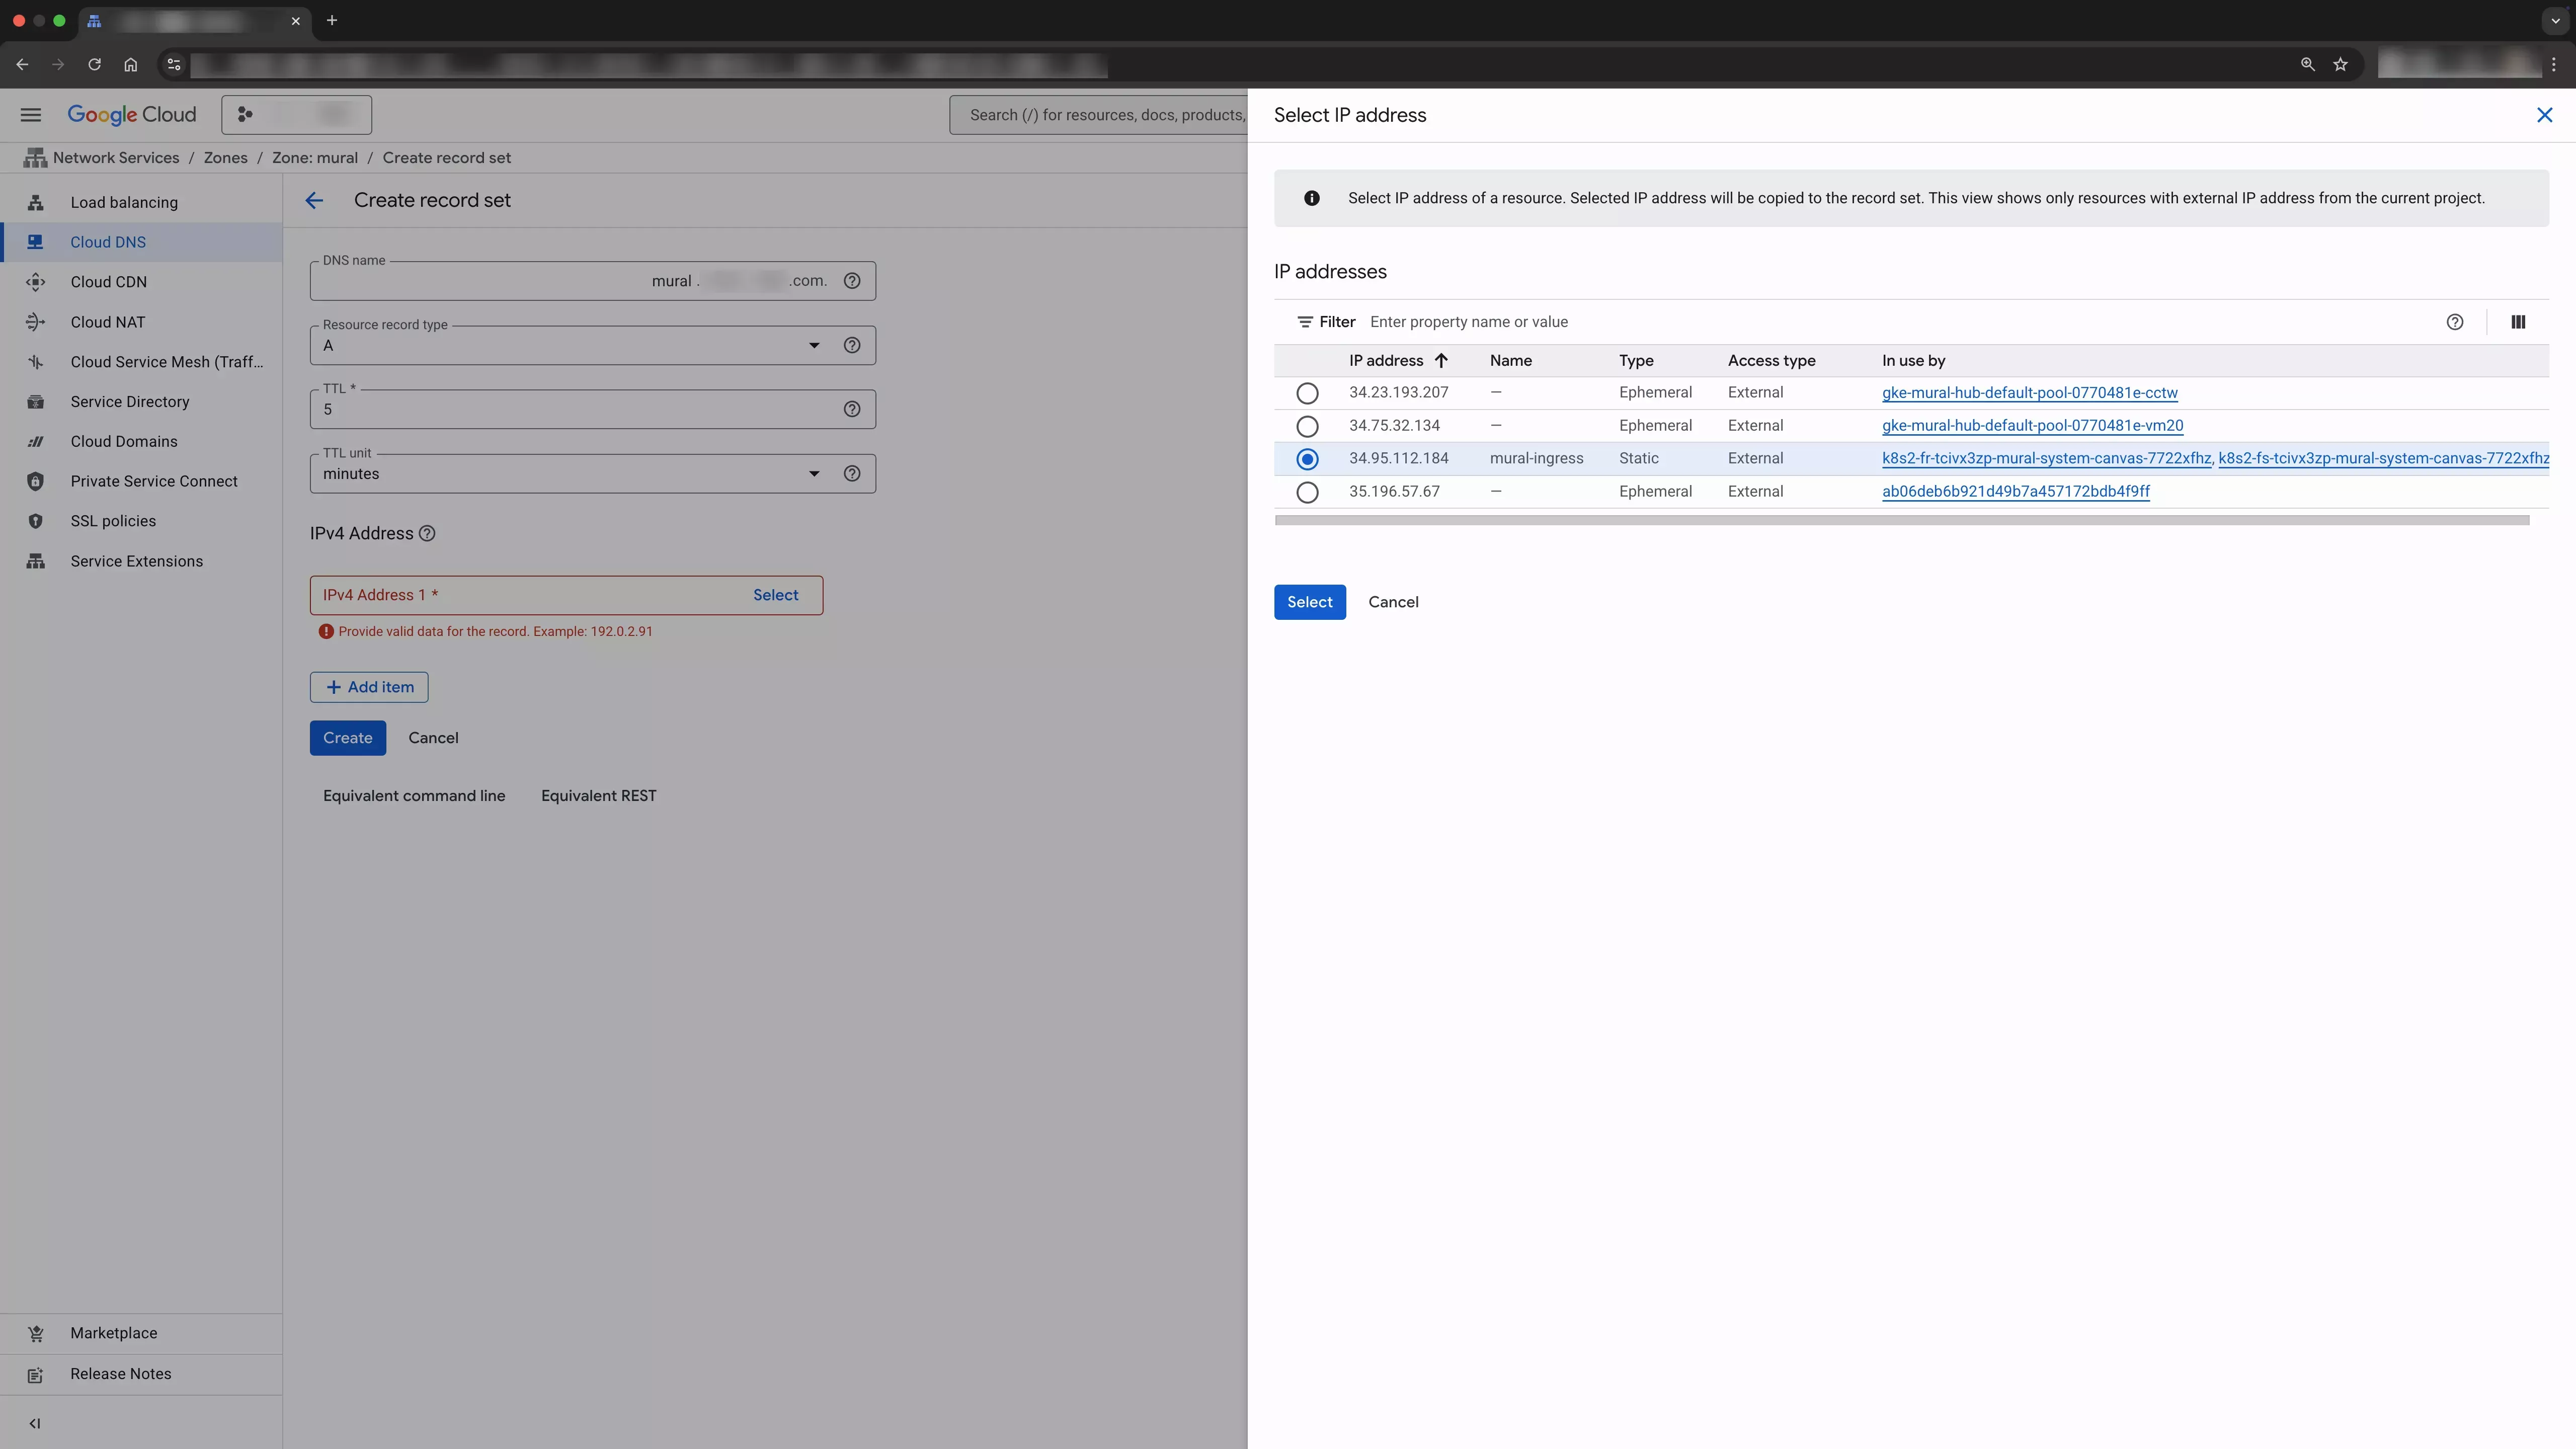 info
infoIt may take a few minutes for the DNS changes to take effect.
You have now deployed PaletteAI on a GKE cluster. If you are using the user impersonation feature or you have set up an OIDC provider, you can now log in to PaletteAI. Alternatively, if Dex local users are enabled, refer to Local Dex Users for the default admin credentials and customization options.
If you need to make changes to PaletteAI, review the Helm Chart Configuration page. Trigger an upgrade to the PaletteAI installation by updating the values.yaml file with the changes you want and running the following command.
helm upgrade mural oci://public.ecr.aws/mural/mural --version 1.4.0 \
  --namespace mural-system --values values.yaml --wait
Validate
-
Verify that the
Gatewayis programmed and that both routes are accepted.kubectl describe gateway mural-gateway --namespace mural-system
kubectl describe httproute canvas --namespace mural-system
kubectl describe httproute dex --namespace mural-systemThe
Gatewaystatus conditions reportProgrammed: Trueonce the load balancer is ready, and eachHTTPRoutestatus reportsAccepted: Truefor its parentGateway.
Take the following steps to verify that PaletteAI is deployed and configured correctly.
-
Open a browser and navigate to the domain URL you configured for PaletteAI.
-
Log in with the default username and password. If you configured Dex with an OIDC connector, log in with your identity provider.
Next Steps
Once PaletteAI is installed on your cluster, you must integrate Palette with PaletteAI using PaletteAI's Settings resource. This resource requires a Palette tenant, project, and API key in order to communicate with Palette and deploy AI/ML applications and models to the appropriate location.
Proceed to the Set Up Palette for PaletteAI guide to prepare your Palette environment.