Deploy PaletteAI
This is the final guide in the PaletteAI appliance installation process. In this guide, you trigger the actual cluster creation process and install PaletteAI on the cluster.
Prerequisites
-
Complete the Prepare Infrastructure section.
-
kubectl installed and available in your
$PATH. -
A cluster virtual IP (VIP) address that is distinct from every control plane node IP. Set this address as Ingress Domain on Profile Config in step 6, then assign the same address as the cluster VIP on Cluster Config in step 7.
Enablement
-
Log in to Local UI on the host where you create the cluster: your only appliance for single-node deployments, or the leader host for three-node deployments. Use the host's IP address and port
5080. For example, if the IP address is10.10.10.10, access Local UI athttps://10.10.10.10:5080. -
Confirm the deployment is ready to create a cluster.
For three-node deployments, verify on the leader host that all linked Edge hosts are Ready and the content is Synced in Linked Edge Hosts. The following screenshot shows a three-node deployment:

For single-node deployments, from the left main menu, select Content and confirm the content bundle upload and sync completed. Do not use Linked Edge Hosts. That page applies only when follower hosts are linked to a leader.
-
From the left main menu, select Cluster > Create Cluster.
-
Assign the cluster a name and provide tags, if desired. Select Next.
-
The Cluster Profile screen displays the imported cluster configuration. Review the configuration and select Next.
-
Complete the Profile Config screen using the custom profile widgets.
After Cluster Profile, Local UI shows Profile Config, a custom widget that groups cluster profile variables into six expandable sections. Each section title shows a short description and a progress indicator (for example, 2 of 2 need input) until required fields in that section are valid. Expand a section with the chevron on the left. Next stays disabled until every required field across all sections passes validation.
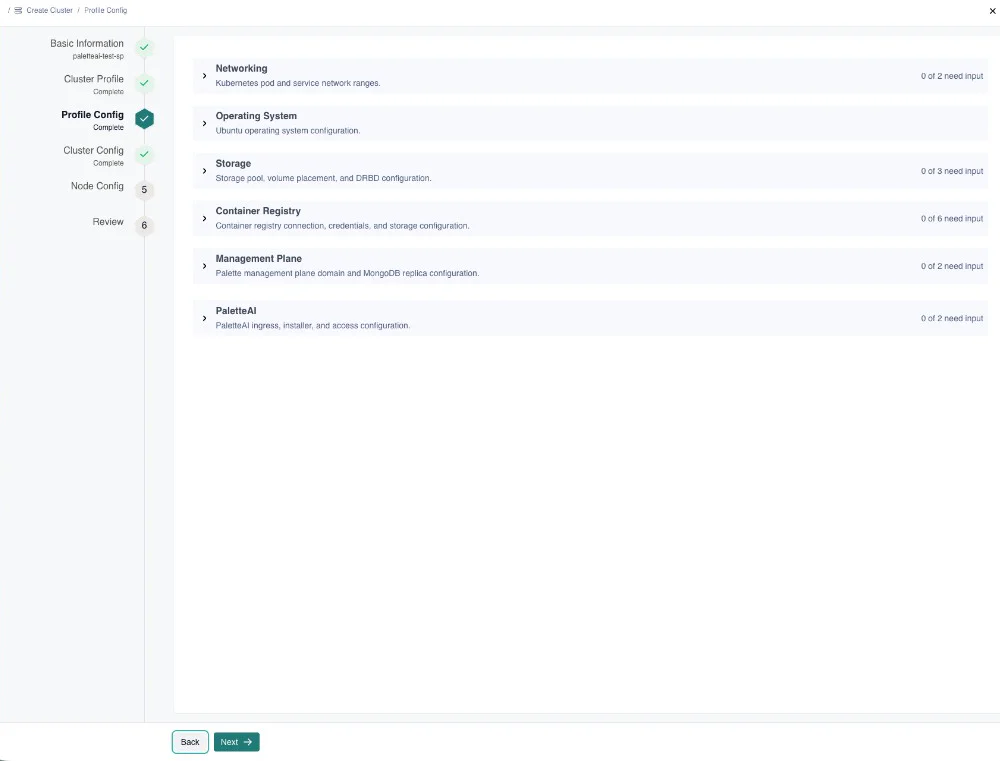
Most Palette-managed fields on Profile Config use the same names, defaults, and accepted values as the Cluster Profile Options and Registry Options tables in the Palette Management Appliance install guide. The steps below list the values to use for a standard PaletteAI appliance install, including PaletteAI-specific fields and topology overrides for single-node labs.
Work through the sections in order:
-
Expand Networking.
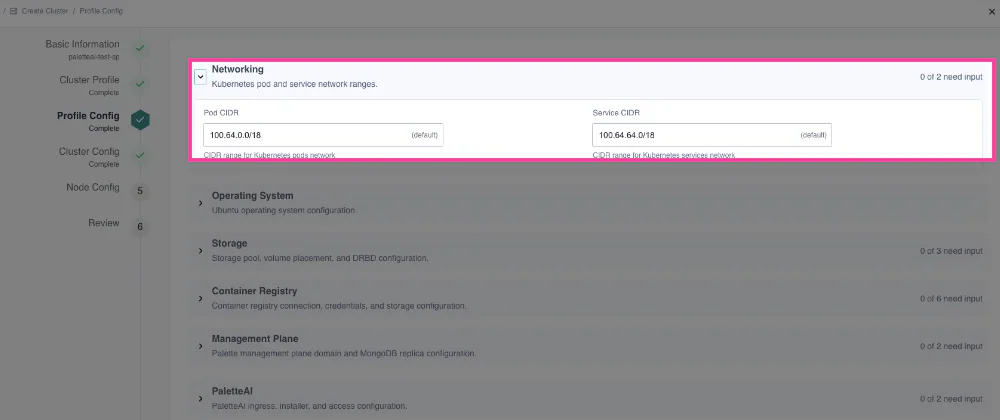
Confirm the defaults from Cluster Profile Options. You do not need to change these for a standard install:
- Pod CIDR:
100.64.0.0/18(default) - Service CIDR:
100.64.64.0/18(default)
When the section shows 0 of 2 need input, collapse it and continue.
- Pod CIDR:
-
Expand Operating System.
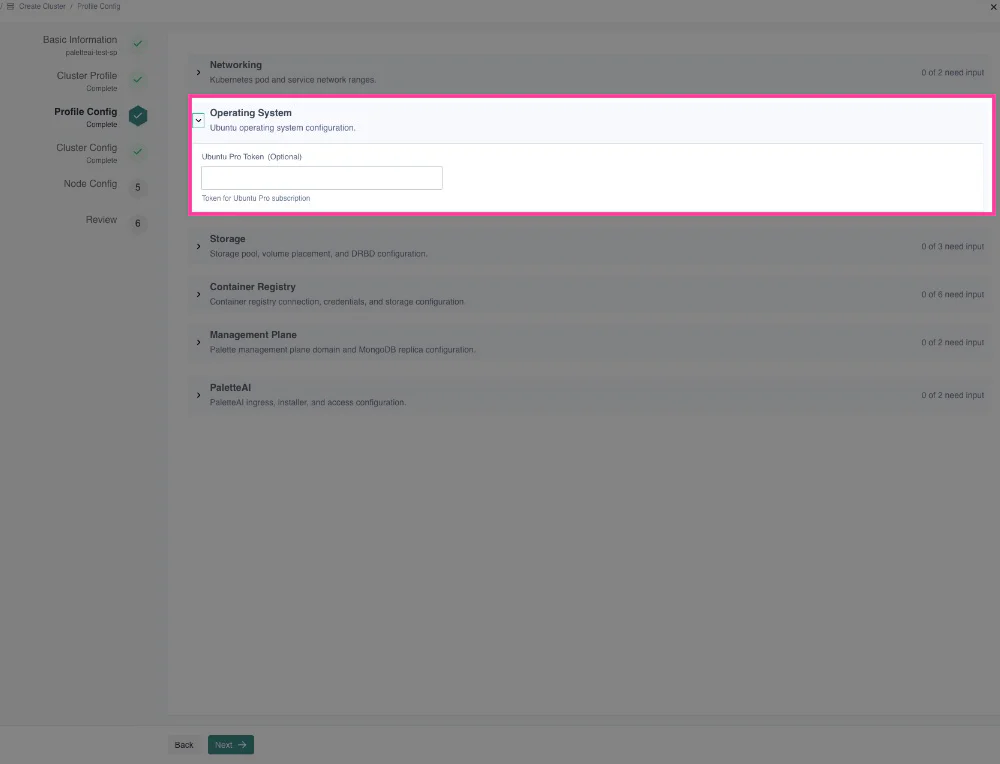
Leave the optional fields blank unless your organization requires them. Refer to Cluster Profile Options:
- Ubuntu Pro Token (Optional): no default; leave blank unless you have an Ubuntu Pro subscription.
- Image pull secret (Optional): no default; leave blank for a standard connected install. Refer to Configure Image Pull Secret if Spectro Cloud support provided a Base64-encoded secret.
-
Expand Storage.
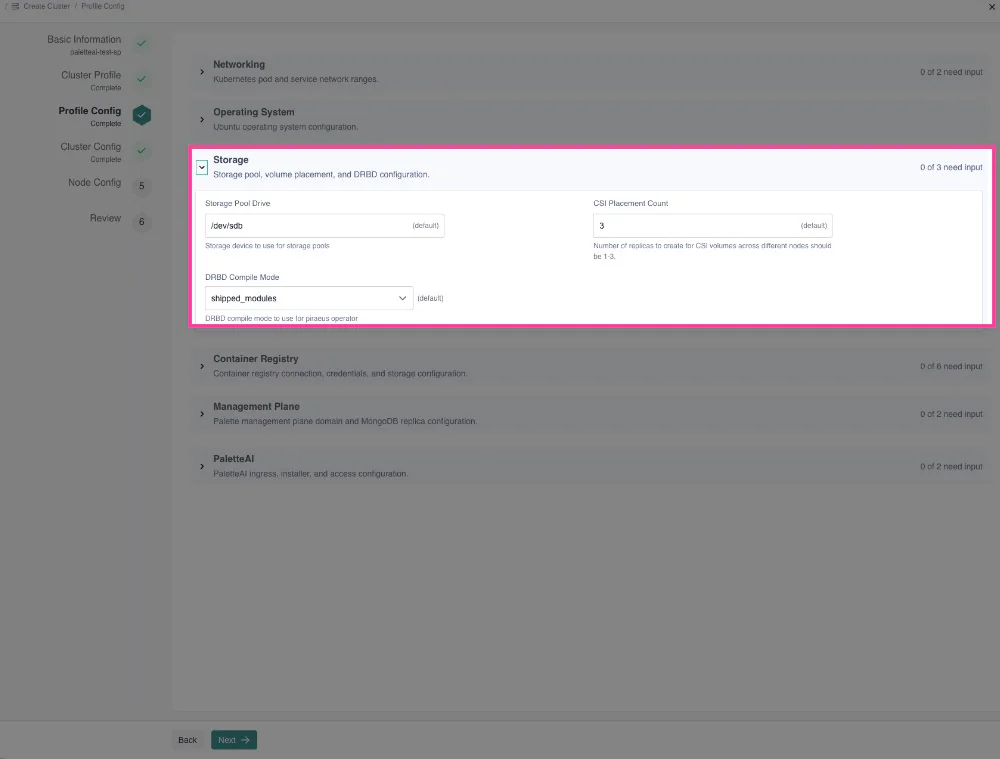
Set the following fields per Cluster Profile Options and DRBD Kernel Module Loading:
- Storage Pool Drive (Optional):
/dev/sdb(default). Assign your second storage device from Prepare Infrastructure. - CSI Placement Count:
3(default; recommended for high availability) for three-node deployments, or1for single-node deployments. Accepted values are1or3. This value must match Mongo Replicas in the Management Plane section. - DRBD Compile Mode:
shipped_modules(default). Compatible with Secure Boot. Do not set tocompileon Secure Boot-enabled nodes.
- Storage Pool Drive (Optional):
-
Expand Container Registry.
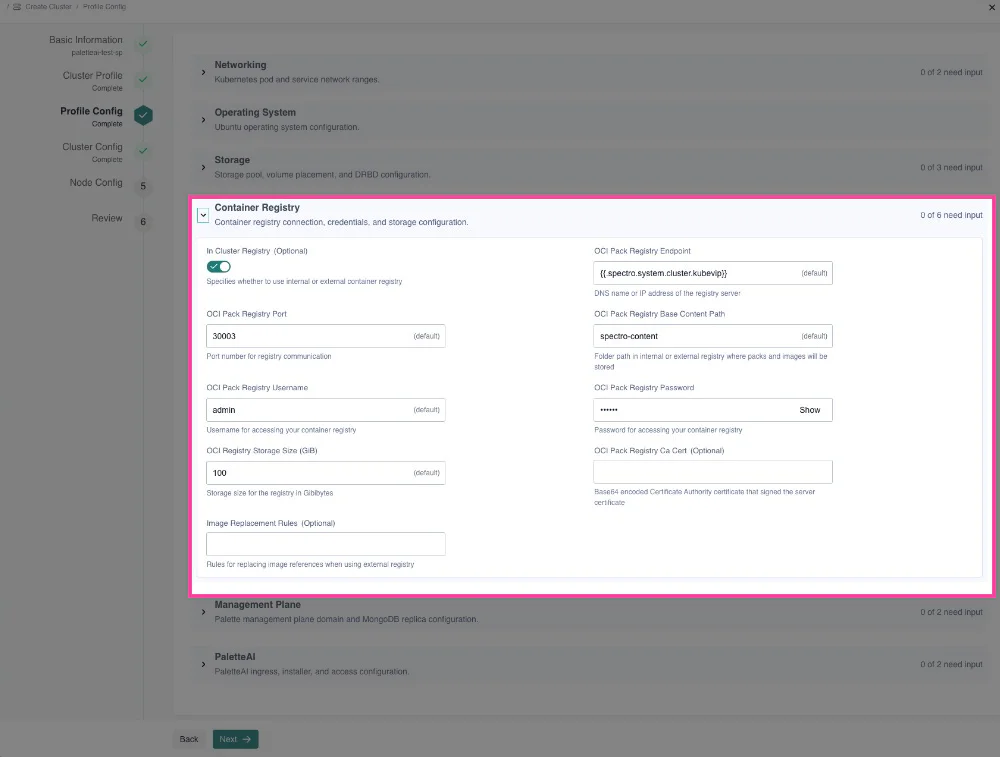
Pack content is supplied by the uploaded content bundle. Configure the registry per Registry Options:
- In Cluster Registry (Optional): ON (default). Uses the internal Zot registry.
- OCI Pack Registry Endpoint:
{{.spectro.system.cluster.kubevip}}(default). Resolves to the cluster VIP at runtime. - OCI Pack Registry Port:
30003(default) - OCI Pack Registry Base Content Path (Optional):
spectro-content(default) - OCI Pack Registry Username:
admin(default) - OCI Pack Registry Password: enter a password. No default; this field is required.
- OCI Registry Storage Size (GiB) (Optional):
100(default). Increase to at least250for production environments. - OCI Pack Registry CA Cert (Optional): leave blank for the internal Zot registry.
- Image Replacement Rules (Optional): leave blank for the internal Zot registry.
When the section shows 0 of 6 need input, collapse it and continue.
-
Expand Management Plane.
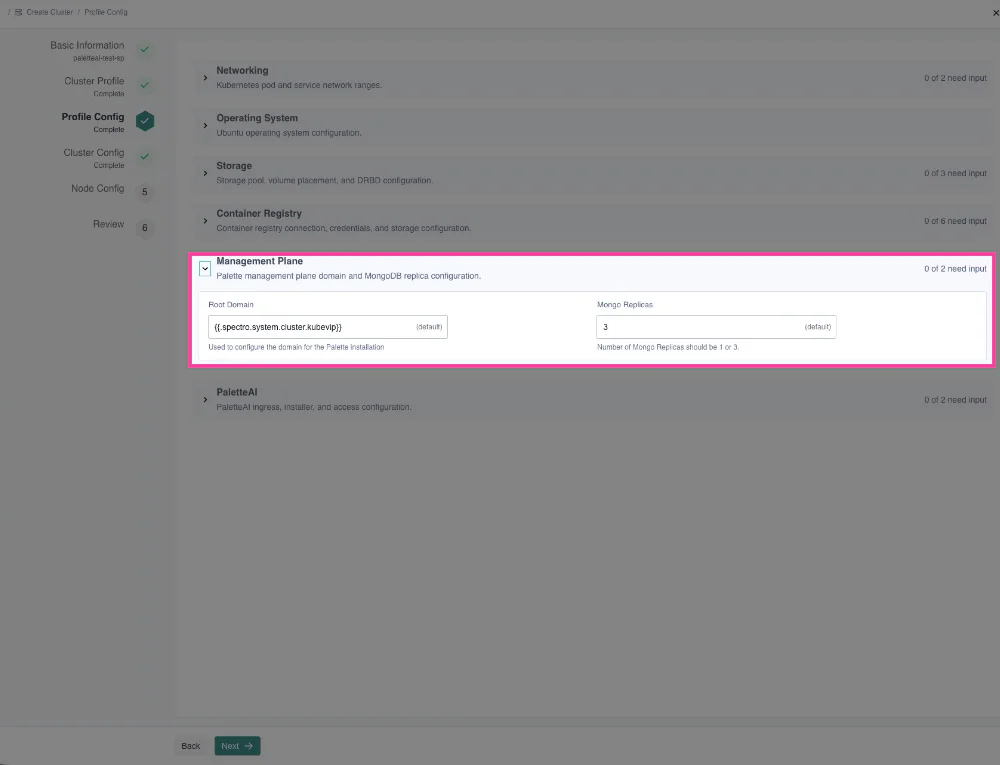
Set the following fields per Registry Options:
- Root Domain (Optional):
{{.spectro.system.cluster.kubevip}}(default). Resolves to the cluster VIP at runtime. - Mongo Replicas:
3(default; recommended for high availability) for three-node deployments, or1for single-node deployments. Accepted values are1or3. This value must match CSI Placement Count in the Storage section.
- Root Domain (Optional):
-
Expand PaletteAI.
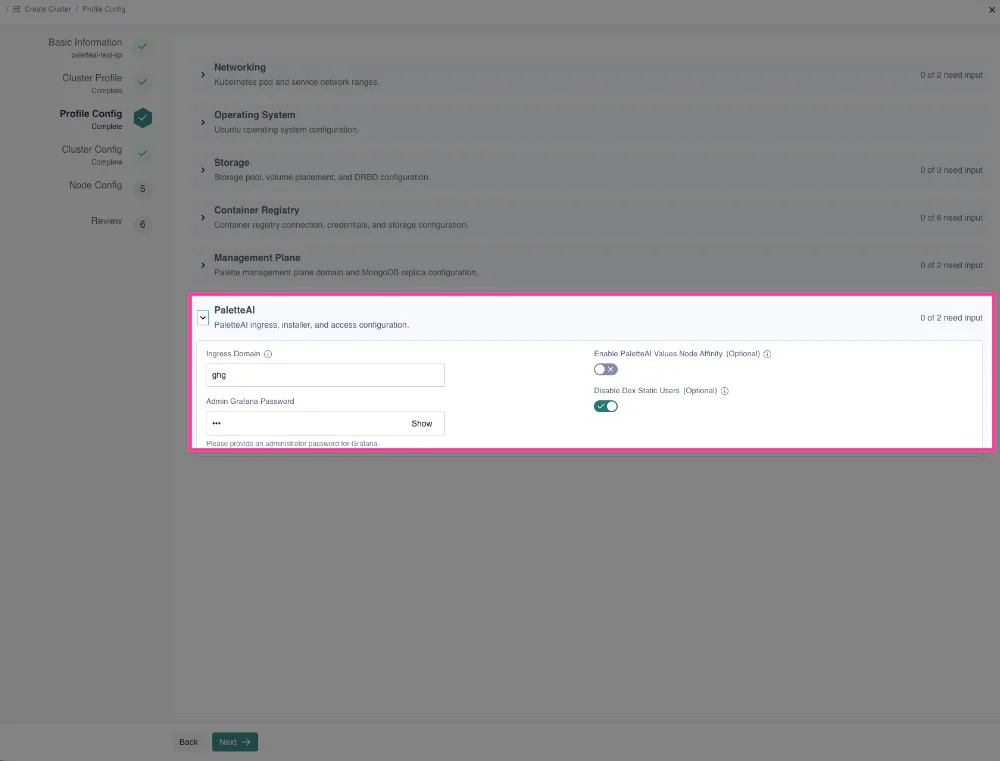
Set the following PaletteAI-specific fields (not listed in the Palette Management Appliance cluster profile tables):
- Ingress Domain: enter the cluster VIP from Prerequisites. Assign the same address again on Cluster Config in step 7.
- Admin Grafana Password: enter a password for Grafana administrator access.
- Enable PaletteAI Values Node Affinity: leave OFF unless you need to customize Helm install values before installation. Refer to Advanced Configuration.
- Disable Dex Static Users: set OFF to enable local Dex login at
/aion day one (admin@example.com/password). Set ON only when you configure external identity providers before first login. Refer to Advanced Configuration.
When the section shows 0 of 2 need input, collapse it and continue.
The following toggles affect authentication and installer behavior. Configure them as necessary:
Parameter Description Disable Dex Static Users Removes the ability to authenticate with local email/password credentials stored in Dex, requiring users to authenticate exclusively through configured external identity providers (OIDC, SAML, or LDAP connectors). Refer to Advanced Configuration for more information on configuring OIDC. Enable PaletteAI Values Node Affinity Schedules the PaletteAI installer pod on a specific node labeled with palette.ai/helm-config: "true", allowing you to use Secure Shell (SSH) to access that node to perform advanced configuration of the Helm install values before installation proceeds. Refer to Advanced Configuration for more information. -
Select Next. If Next is disabled, expand each section and resolve any fields still marked as needing input.
-
-
On the Cluster Config screen, specify any of the following per Cluster Config Options, as necessary. Select Next when finished.
-
Network Time Protocol (NTP) (Optional): no default
-
SSH Keys (Optional): no default
-
Virtual IP Address (VIP): enter the cluster VIP from Prerequisites. Use the same address you set for Ingress Domain on Profile Config in step 6.
-
Enable overlay: leave OFF unless your network design requires an overlay CIDR (PaletteAI-specific; not in the Palette Management Appliance cluster config table)
warningDo not assign any control plane node's IP address (including the leader, or your only appliance in single-node mode) as the VIP address. The VIP must be a different IP address.
-
-
On the Node Config screen, add the required nodes for your deployment. For three-node deployments, add all three control plane nodes. There are additional options that you can configure. The following tables describe additional configuration options. Select Next when finished.
Node Pool Options
- Control Plane Pool Options
- Worker Pool Options
Option Description Type Default Node pool name The name of the control plane node pool. This is used to identify the node pool in Local UI. The name must be 62 characters or less. String control-plane-poolAllow worker capability Allow applications to be scheduled on this control plane node pool. This option must be enabled. Boolean trueAdditional Kubernetes Node Labels (Optional) Tags for the node pool in key:valueformat. These tags are used to filter and search for node pools in Local UI.String No default Taints Taints for the node pool in key=value:effectformat. Taints are used to prevent pods from being scheduled on the nodes in this pool unless they tolerate the taint.- Key - String
- Value - String
- Effect - String (enumerated)No default Option Description Type Default Node pool name The name of the worker node pool. This is used to identify the node pool in Local UI. The name must be 62 characters or less and cannot be control-plane-pool.String worker-poolAdditional Kubernetes Node Labels (Optional) Tags for the node pool in key:valueformat. These tags are used to filter and search for node pools in Local UI.String No default Taints Taints for the node pool in key=value:effectformat. Taints are used to prevent pods from being scheduled on the nodes in this pool unless they tolerate the taint.- Key - String
- Value - String
- Effect - String (enumerated)No default Pool Configuration
The following options are available for both the control plane and worker node pools. Configure these options to your requirements. You can also remove worker pools if not needed.
For a management-only three-node cluster, add all edge hosts to control-plane-pool, enable Allow worker capability, and remove the worker-pool.
Option Description Type Default Architecture The CPU architecture of the nodes. This is used to ensure compatibility with the applications operating on the nodes. String (enumerated) amd64Add Edge Hosts Select Add Item and choose the other hosts that you installed using the PaletteAI ISO. These hosts are added to the node pool. Each pool must contain at least one node. N/A - Control Plane Pool - Current host selected
- Worker Pool - No host selectedNIC Name The name of the network interface card (NIC) to use for the nodes. Leave on Auto to let the system choose the appropriate NIC, or select one manually from the drop-down menu. N/A Auto Host Name (Optional) The hostname for the nodes. This is used to identify the nodes in the cluster. A generated hostname is provided automatically, which you can adjust to fit your requirements. String edge-*
-
On the Review screen, ensure that your configuration is correct. If you need to make changes, select the applicable section on the left sidebar to go back and edit the configuration.
When you are satisfied with your configuration, select Deploy Cluster to begin the cluster creation process.
The cluster creation process takes approximately 30 to 45 minutes to complete. Monitor cluster progress from the left main menu by selecting Cluster > Overview. The cluster finishes provisioning when the status changes to Running and the health status is Healthy.
Validate
-
Log in to Local UI on the same host you used in Enablement (your only appliance for single-node deployments, or the leader host for three-node deployments).
-
Verify the cluster is running and the health status is Healthy. Download the kubeconfig file for the cluster.
-
Set up the kubeconfig file to access the cluster. This allows you to use
kubectlto access the cluster.export KUBECONFIG=<kubeconfig-path> -
Verify all pods are in the Running state.
kubectl get pods --all-namespaces -
Verify you can access the following components. Replace
<domain-or-vip-address>with the domain or VIP you configured for the cluster.-
Palette system console -
https://<domain-or-vip-address>/system. -
Palette -
https://<domain-or-vip-address>. -
PaletteAI -
https://<domain-or-vip-address>/ai.
-
Complete Palette Setup
Complete this section before you use the Palette tenant UI or the PaletteAI Settings integration in Next Steps.
Credential Reference
| UI | URL | Credentials |
|---|---|---|
| Local UI (edge) | https://<node-ip>:5080 | Credentials from step 11 of Install the PaletteAI Edge Image |
| System console | https://<domain-or-vip-address>/system | admin / admin, then admin / your updated system password |
| Palette tenant | https://<domain-or-vip-address> | admin / your updated system password (after tenant activation) |
| PaletteAI | https://<domain-or-vip-address>/ai | admin@example.com / password when Disable Dex Static Users is OFF |
Log In to the System Console
-
Open
https://<domain-or-vip-address>/system. -
Log in with username
adminand passwordadmin. -
Complete Update password for system user and set a new system administrator password.
-
Log in again with
adminand your new system password.
Create and Activate a Tenant
-
Select Tenant Management.
-
Add a new tenant.
-
Activate the tenant from the UI.
Verify the Palette Tenant UI
-
Open
https://<domain-or-vip-address>(root path — not/ai). -
Log in with
adminand your system administrator password. -
Confirm you can access the tenant you created.
Log In to PaletteAI
-
Open
https://<domain-or-vip-address>/ai. -
When Disable Dex Static Users is OFF (recommended for day one):
Field Default Email admin@example.comPassword password -
Confirm successful login to PaletteAI.
Advanced Configuration
Out of the box, the PaletteAI installer deploys the PaletteAI Helm chart with sensible default values. However, you can customize the deployment by editing the values.yaml file that is used by the installer. A copy of the file is located on each node in the cluster, under /usr/local/palette-ai/values.yaml.
How the Installer Merges Values
The values.yaml file on the host is not the final set of values passed to Helm. The placeholder strings in the default values.yaml file — such as replace.with.your.domain — are replaced automatically by the installer. You do not need to update them manually.
The merged values are never written back to the values.yaml file on the host. The file retains your edits between installer runs, and the installer merges your edits with the installer-managed values on every run. The installer runs as a one-time Kubernetes Job at initial installation. Refer to Inspect the Installer Job for details on how the installer runs and how to check its status.
Each time the PaletteAI installer runs, it constructs the final values by merging three layers in the following order, where later layers take priority over earlier ones:
-
Your
values.yamlfile on the host (lowest priority) -
Runtime-generated values: domain-derived configuration (DNS, Dex, Canvas, metrics URLs), auto-generated credentials (Dex client secrets, Prometheus auth), and OCI registry settings. These are derived from the settings you provided in Local UI, such as the root domain.
-
System-enforced overrides hardcoded in the installer — primarily component enable/disable flags and the deployment mode (highest priority)
Installer-Managed Fields
The following fields are set or overridden by the installer. Edits to these fields in values.yaml have no effect.
Fields marked with an asterisk (*) are only overridden when a root domain is configured in Local UI. Fields marked with a dagger (†) are only overridden under specific conditions described in the table; they remain customizable otherwise.
| Field | Value Set by Installer |
|---|---|
global.featureFlags.versioningType | Always semantic |
global.featureFlags.deploymentMode | connected or airgap, determined by the installer |
global.dns.domain | Your root domain from Local UI * |
global.dns.rootIngress.enabled | Always false |
global.instanceName | Derived from root domain * |
global.metrics.grafanaUrl | Derived from root domain * |
global.metrics.prometheusBaseUrl | Derived from root domain * |
global.metrics.username | Auto-generated Prometheus credential * |
global.metrics.password | Auto-generated Prometheus credential * |
traefik.enabled | Always true |
cert-manager.enabled | Always false |
flux2.enabled | Always false |
zot.enabled | Always false |
brush.certManager.enabled | Always false |
brush.mural.source | Internal Zot registry settings (airgap mode only) |
brush.muralCrds.source | Internal Zot registry settings (airgap mode only) |
fleetConfig.enabled | Always true |
fleetConfig.hub.apiServer | https://<rootDomain>:6443 * |
fleetConfig.spokeValuesOverrides | Auto-generated spoke configuration |
fleetConfig.spokes[0].ociRegistry | Internal Zot registry settings (airgap mode only) |
hue.ociRegistry | Internal Zot registry settings (airgap mode only) |
canvas.ingress.enabled | Always true |
canvas.ingress.matchAllHosts | Always true |
canvas.enableHTTP | Always true |
canvas.oidc.redirectURL | https://<rootDomain>/ai/callback * |
dex.ingress.enabled | Always false |
dex.config.issuer | https://<rootDomain>/dex * |
dex.config.staticClients | Auto-generated Dex client configuration * |
dex.config.staticPasswords † | Cleared when Disable Dex Static Users is enabled |
The installer derives fleetConfig.hub.apiServer from your root domain, which is externally reachable by design, so the appliance installation is not subject to the internal-endpoint pitfall described in Dedicated Spokes. If you override this field manually in Update Values After Installation, keep the value an externally reachable endpoint so dedicated spoke clusters can continue to reach the hub.
Customizable Fields
The following fields are safe to customize in values.yaml. Edits to these fields are preserved across installer runs.
-
dex.config.connectors— OIDC, LDAP, or SAML identity provider connectors. This is the primary field most installations need to customize. Refer to the Dex documentation for connector configuration options. -
dex.config.staticPasswords— Local user credentials. This field is customizable when Disable Dex Static Users is not enabled. Refer to the Installer-Managed Fields table for behavior when that option is enabled.
If Dex local users are disabled, you must finalize values.yaml before installation and configure at least one valid Dex connector. Refer to Local Dex Users for the default credentials, customization paths, and related operational caveats.
Any field not listed in the Installer-Managed Fields table above is also customizable.
Instance Name and Spoke Metrics
The installer derives global.instanceName automatically from the root domain you configure in Local UI. It is used to uniquely identify metrics related to this PaletteAI installation.
To use your own identifier, set global.instanceName in /usr/local/palette-ai/values.yaml using the custom values.yaml workflow.
Refer to Configure Prometheus Agent Monitoring for more detail on how this relates to spoke metrics.
Configure Values Before Initial Installation
To customize values before PaletteAI is installed for the first time, use the Enable PaletteAI Values Node Affinity option on Profile Config to pause the installer until you have finished editing the file.
-
In Local UI, on the Profile Config screen, toggle Enable PaletteAI Values Node Affinity to ON. This prevents the PaletteAI installer from being scheduled until a node with the label
palette.ai/helm-config: "true"is found.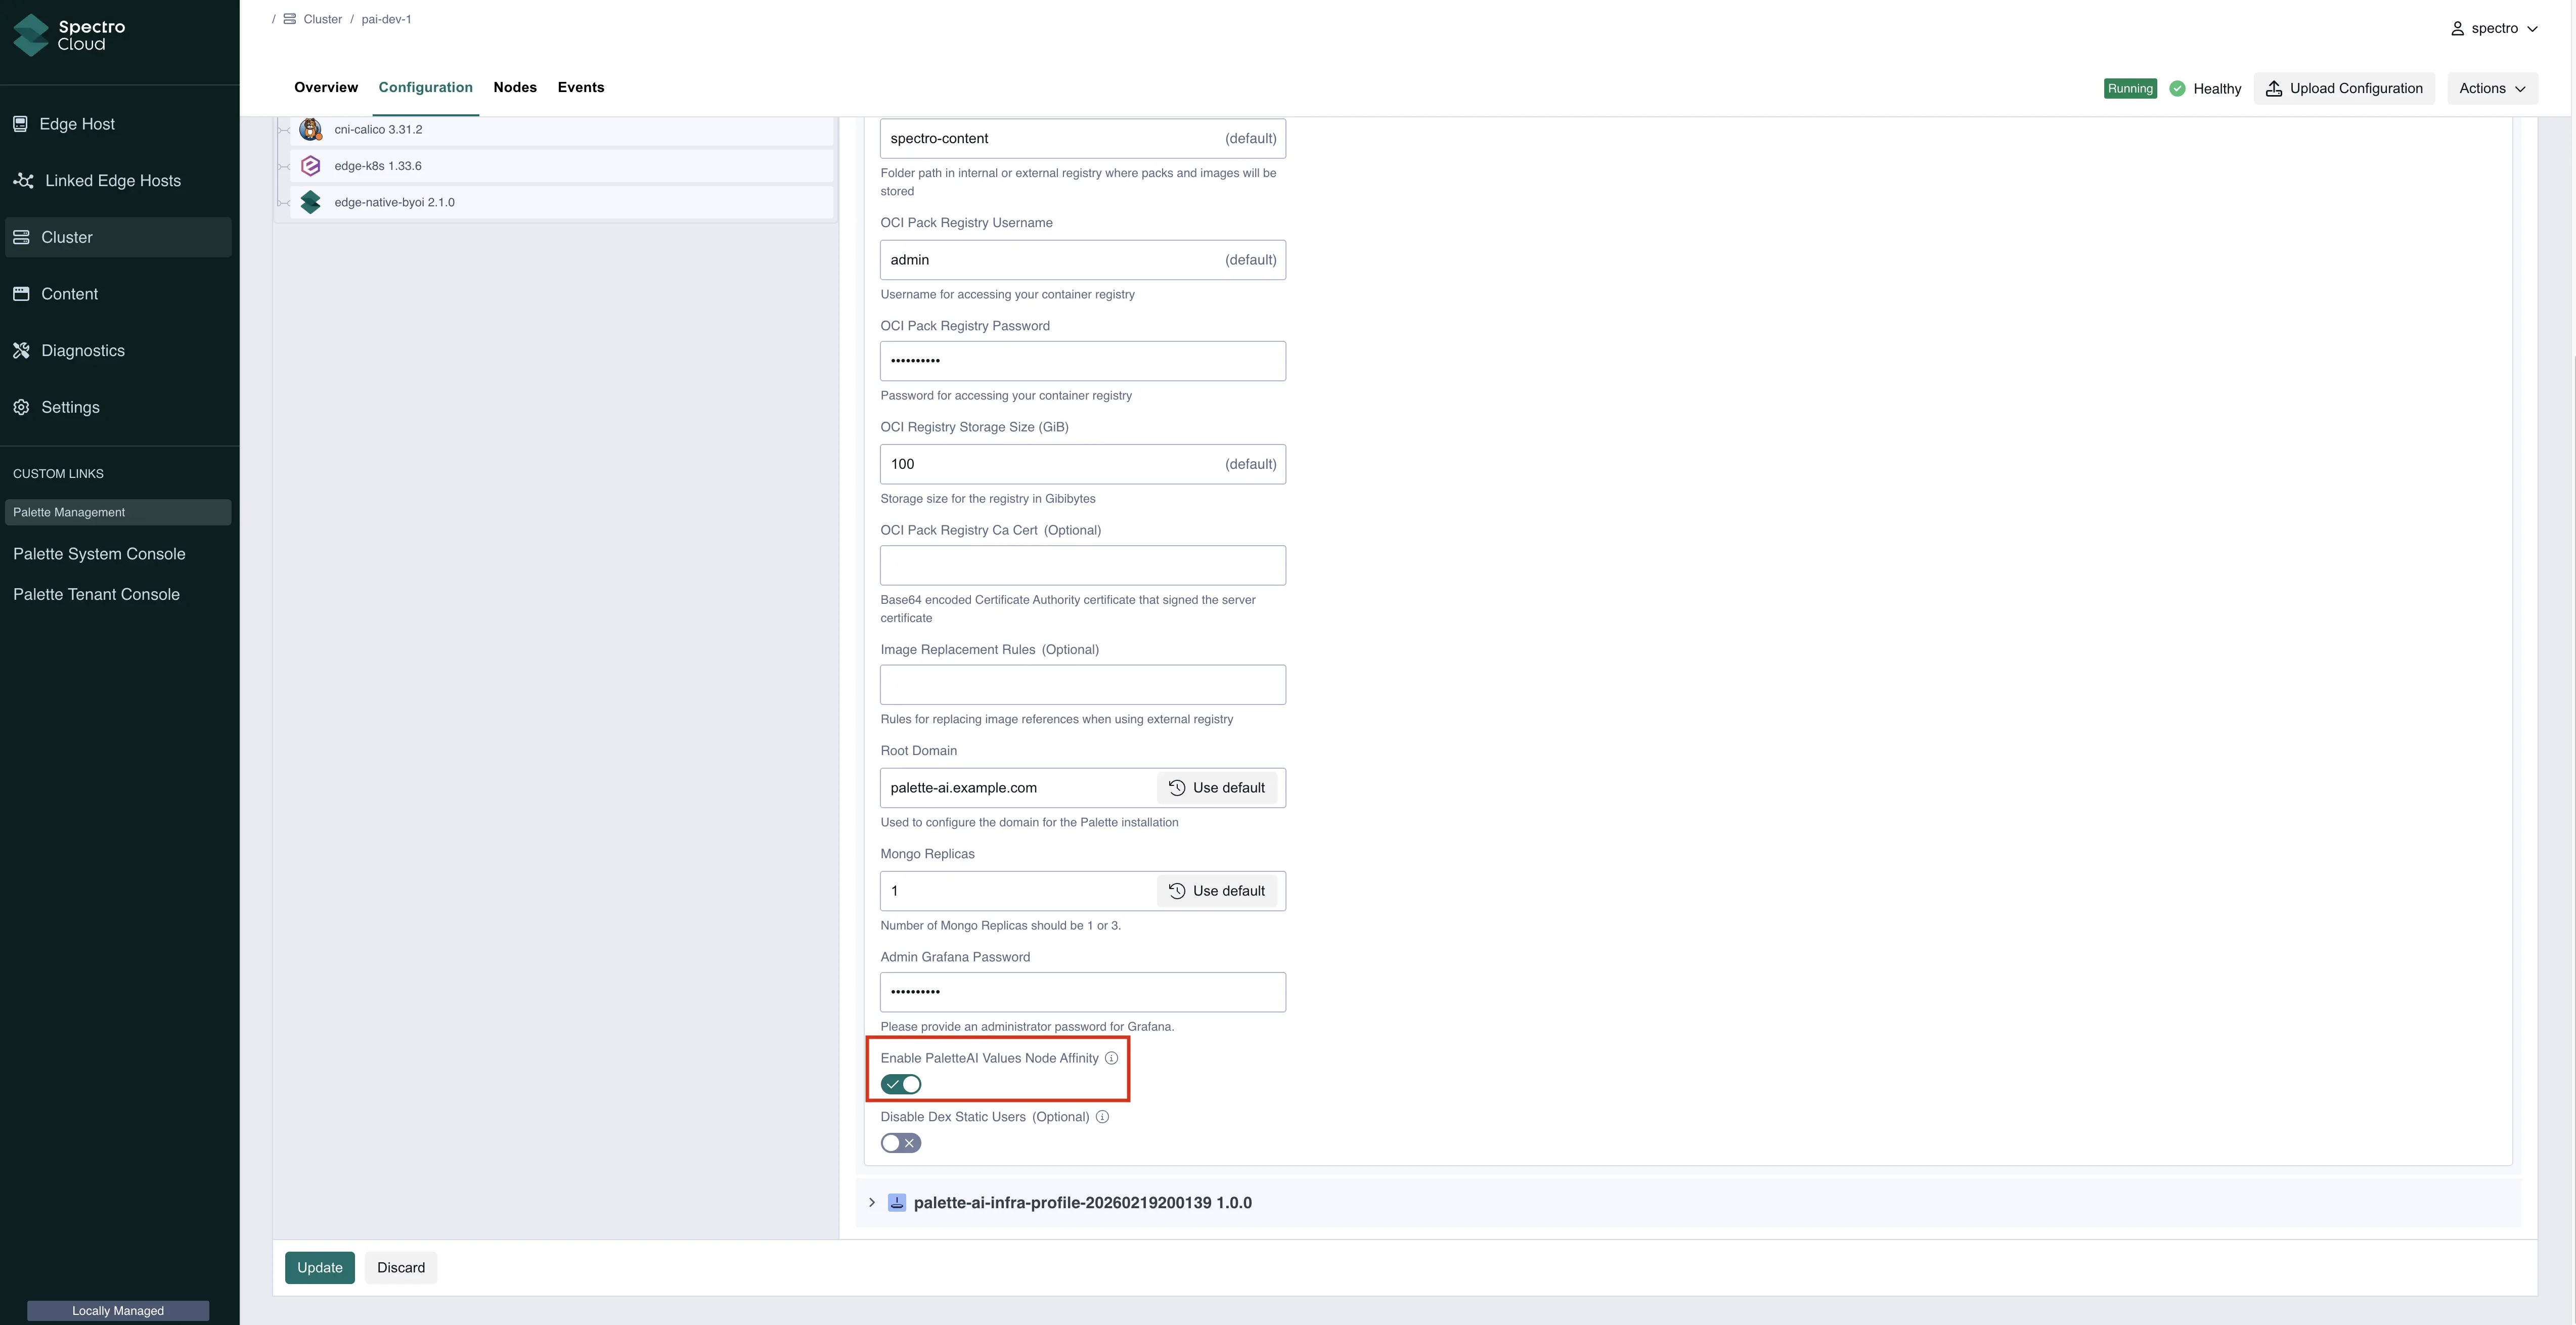
-
Choose the node that you want to use for configuring the values. This is the node whose
values.yamlfile you modify, and where the PaletteAI installer is scheduled. Make note of the node's hostname. -
SSH into the node.
ssh <username>@<node-hostname> -
Modify the
values.yamlfile to your desired configuration. Refer to the Helm Chart Configuration Reference for more information on the available options. Save the file and exit the editor.sudo vi /usr/local/palette-ai/values.yaml -
From a shell with
kubectlaccess to the appliance cluster, label the same node where you edited thevalues.yamlfile with the labelpalette.ai/helm-config: "true".kubectl label node <node-hostname> palette.ai/helm-config=truewarningIn a three-node cluster, ensure that only one node is labeled with
palette.ai/helm-config: "true". If multiple nodes are labeled, the PaletteAI installer pod can be scheduled on different nodes on each run, which causes inconsistent installation behavior.
After you label the node, the PaletteAI installer pod transitions from the Pending state to the Running state.
Inspect the Installer Job
The PaletteAI installer runs as a one-time Kubernetes Job in the Helm release namespace (mural-system by default). The Job creates the Flux OCIRepository and HelmRelease resources that install PaletteAI, using the merged values described in How the Installer Merges Values. Flux then installs and reconciles the PaletteAI Helm chart.
The installer Job runs once, at initial installation. It is not a recurring job and does not re-run after installation completes. When you upgrade the appliance, the installer Job is removed, so an empty Job list after an upgrade is expected. To change values after installation, refer to Update Values After Installation.
The installer Job and its pods carry the label app.kubernetes.io/name: palette-ai. Use the following commands to inspect the Job and its recent pods.
-
List the installer Job. A
COMPLETIONSvalue of1/1indicates the installer finished successfully.kubectl get jobs --namespace mural-system --selector app.kubernetes.io/name=palette-ai -
List the installer pods. If a run fails, Kubernetes retries with a new pod up to three times before marking the Job as failed, so you may find multiple pods.
kubectl get pods --namespace mural-system --selector app.kubernetes.io/name=palette-ai -
Review the Job details and events, such as retry and failure events.
kubectl describe job --namespace mural-system --selector app.kubernetes.io/name=palette-ai -
View the installer logs. Replace
<pod-name>with a pod name from the previous list to review a specific run, including earlier failed attempts.kubectl logs --namespace mural-system --selector app.kubernetes.io/name=palette-ai
kubectl logs <pod-name> --namespace mural-systemA successful run logs
successfully upserted releasefor each release. If the installer finds an existingHelmRelease, it logshelm release already exists, skippingand leaves the release untouched, so a repeated installer run never overwrites values on an existing installation.
Troubleshooting Installer Job Failures
If the installer Job does not complete, start with the pod status and logs from Inspect the Installer Job, then check the following common causes.
Installer pod stuck in Pending. If Enable PaletteAI Values Node Affinity is enabled, the installer pod only schedules on a node labeled palette.ai/helm-config: "true". Verify that exactly one node carries the label, and label the intended node if none is labeled.
kubectl get nodes --selector palette.ai/helm-config=true
Installer pod fails with ErrImagePull or ImagePullBackOff. The cluster cannot pull the installer container image. Review the pod events for the failing registry URL, and verify the cluster's network access to that registry.
kubectl describe pod <pod-name> --namespace mural-system
Logs contain failed to get values from URL or HTTP request failed with status. The installer fetches values.yaml over HTTPS from the node where the installer pod is scheduled, on port 11443 by default. This error indicates the values file server on that node is unreachable or returned an error status. Verify the node is healthy, then wait for the Job to retry.
Logs contain failed to unmarshal YAML values. The /usr/local/palette-ai/values.yaml file on the host contains invalid YAML. SSH into the node, fix the syntax error — indentation errors and unquoted special characters are frequent causes — and save the file.
Logs contain failed to setup internal Zot. In airgap mode, the installer reads the internal registry's CA certificate from the zot-secret Secret in the zot-system namespace. Verify the Secret exists and contains the caCrt key.
kubectl get secret zot-secret --namespace zot-system --output yaml
The Job completed, but PaletteAI is not operating. The installer only creates the Flux resources; Flux performs the actual installation and retries failed installations automatically. Check the Flux resources in the mural-system namespace and review their status conditions for errors, such as chart pull failures caused by registry or network issues.
kubectl get ocirepositories,helmreleases --namespace mural-system
kubectl describe helmrelease mural --namespace mural-system
If you resolve a failure cause while the Job is still retrying, no further action is needed — the next retry picks up the fix. If the Job has exhausted its retries and is marked as failed, open a support ticket for help re-running the installer.
Update Values After Installation
After PaletteAI is installed, change customizable Helm values by editing the mural HelmRelease in the mural-system namespace. Flux reconciles the release and applies your changes.
The values.yaml file on cluster nodes (/usr/local/palette-ai/values.yaml) is only used during the initial installation. After installation completes, edits to that file have no effect on the running deployment, and the installer Job does not re-run to apply them. Post-install changes are applied by Flux, not by the installer.
-
Ensure
kubectlcan access the cluster. If you have not already configured access, setKUBECONFIGto the kubeconfig you downloaded during validation.export KUBECONFIG=<kubeconfig-path> -
Open the
muralHelmReleasefor editing.kubectl edit helmrelease mural --namespace mural-systemBy default,
kubectl editopensvi. To use a different editor, setKUBE_EDITORbefore running the command. For example:export KUBE_EDITOR=nano
kubectl edit helmrelease mural --namespace mural-system -
Under
spec.values, add or change the fields you need. At this stage, any value can be modified and it will not be overwritten. Save the file and exit the editor.warningAny field listed in the Installer-Managed Fields table can also be modified, however this is not advised. These fields are automatically configured by the installer and modifying them may lead to unexpected behavior. Refer to the Helm Chart Configuration Reference for available options.
For example, to update Dex local user credentials after installation, edit
spec.values.dex.config.staticPasswords. Refer to Local Dex Users for password hashing and related guidance. -
Flux applies your changes the next time it reconciles the release, at the interval defined in the
HelmReleasespec.intervalfield. To check the configured interval, run the following command.kubectl get helmrelease mural --namespace mural-system --output jsonpath='{.spec.interval}'To apply the change immediately instead of waiting for the next scheduled reconciliation, request a reconciliation by annotating the
HelmRelease. Refer to the Flux documentation for details on this annotation.kubectl annotate --field-manager=flux-client-side-apply --overwrite \
helmrelease/mural --namespace mural-system \
reconcile.fluxcd.io/requestedAt="$(date +%s)" -
Confirm that Flux has reconciled the release.
kubectl get helmrelease mural --namespace mural-systemThe
READYcolumn should showTrueafter reconciliation completes. To follow the reconciliation as it progresses, add the--watchflag. If the release does not become ready, review its status conditions and events.kubectl describe helmrelease mural --namespace mural-system
Next Steps
Complete Complete Palette Setup before you integrate Palette with PaletteAI.
Once Palette and PaletteAI are installed on your new cluster, you must integrate Palette with PaletteAI using PaletteAI's Settings resource. This resource requires a Palette tenant, project, and API key in order to communicate with Palette and deploy artificial intelligence and machine learning (AI/ML) applications to the appropriate location.
Proceed to the Set Up Palette for PaletteAI guide to prepare your Palette environment.