Deploy PaletteAI
This guide is the final step in the PaletteAI appliance installation process. In this guide, you will create the cluster and install PaletteAI on it.
Log in to Local UI on the host where you create the cluster: your only appliance for single-node deployments, or the leader host for three-node deployments after the hosts are linked.
Prerequisites
-
Completed the Prepare Infrastructure section.
-
kubectl installed and available in your
$PATH.
Enablement
-
Open Local UI in your browser using the host's IP address and port
5080. For example, if the IP address is10.10.10.10, go tohttps://10.10.10.10:5080. Log in with the credentials you set during edge installation. -
Confirm the deployment is ready to create a cluster.
- Single node
- Three-node
You do not use Linked Edge Hosts in single-node mode — there are no follower hosts to link. When Local UI loads on the appliance, continue to the next step.
On the leader host, verify that all linked Edge hosts are Ready, content is Synced, and health status is Healthy in Linked Edge Hosts in Local UI.

-
From the left main menu, select Cluster > Create cluster.
-
Assign the cluster a name and provide tags, if desired. Select Next.
-
The Cluster Profile screen displays the imported cluster configuration. Review the configuration and select Next.
-
Complete all applicable fields on the Profile Config screen. Most of the fields are related to installing self-hosted Palette on the cluster. Refer to the Palette Management Appliance install guide for more information on these fields.
For PaletteAI, toggle the following fields as necessary.
Parameter Description Disable Static Dex Users Removes the ability to authenticate with local email/password credentials stored in Dex, requiring users to authenticate exclusively through configured external identity providers (OIDC, SAML, or LDAP connectors). Refer to Advanced Configuration for more information on configuring OIDC. Enable Values Node Selector Schedules the PaletteAI installer pod on a specific node labeled with palette.ai/helm-config: "true", allowing you to SSH into that node to perform advanced configuration of the Helm install values before installation proceeds. Refer to Advanced Configuration for more information.Select Next when finished.
-
On the Cluster Config screen, specify any of the following, as necessary. Select Next when finished.
-
Network Time Protocol (NTP) server
-
SSH keys
-
VIP address to assign to the cluster
warningDo not assign any control plane node's IP address (including the leader or your only appliance in single-node mode) as the VIP address. The VIP must be a different IP address.
-
-
On the Node Config screen, add the required nodes for your deployment. For multi-node deployments, a minimum of three control plane nodes is required. There are additional options that you can configure. The following tables describe additional configuration options. Select Next when finished.
Node Pool Options
- Control Plane Pool Options
- Worker Pool Options
Option Description Type Default Node pool name The name of the control plane node pool. This is used to identify the node pool in PaletteAI. The name must be 62 characters or less. String control-plane-poolAllow worker capability Allow applications to be scheduled on this control plane node pool. Keep this option enabled. Boolean trueAdditional Kubernetes Node Labels (Optional) Tags for the node pool in key:valueformat. These tags are used to filter and search for node pools in PaletteAI.String No default Taints Taints for the node pool in key=value:effectformat. Taints are used to prevent pods from being scheduled on the nodes in this pool unless they tolerate the taint.- Key - String
- Value - String
- Effect - String (enum)No default Option Description Type Default Node pool name The name of the worker node pool. This is used to identify the node pool in PaletteAI. The name must be 62 characters or less and cannot be control-plane-pool.String worker-poolAdditional Kubernetes Node Labels (Optional) Tags for the node pool in key:valueformat. These tags are used to filter and search for node pools in PaletteAI.String No default Taints Taints for the node pool in key=value:effectformat. Taints are used to prevent pods from being scheduled on the nodes in this pool unless they tolerate the taint.- Key - String
- Value - String
- Effect - String (enum)No default Pool Configuration
The following options are available for both the control plane and worker node pools. Configure these options to your requirements. You can also remove worker pools if not needed.
Option Description Type Default Architecture The CPU architecture of the nodes. This is used to ensure compatibility with the applications operating on the nodes. String ( enum)amd64Add Edge Hosts Three-node: Select Add Item and choose the other hosts you installed with the PaletteAI appliance ISO so each pool lists the right machines. Single-node: Do not add other hosts — the current host is enough. Each pool must contain at least one node. Not applicable - Control Plane Pool - Current host selected
- Worker Pool - No host selectedNIC Name The name of the network interface card (NIC) to use for the nodes. Leave on Auto to let the system choose the appropriate NIC, or select one manually from the drop-down menu. Not applicable Auto Host Name (Optional) The hostname for the nodes. This is used to identify the nodes in the cluster. A generated hostname is provided automatically, which you can adjust to fit your requirements. String edge-*
-
On the Review screen, ensure that your configuration is correct. If you need to make changes, select the applicable section on the left sidebar to go back and edit the configuration.
When you are satisfied with your configuration, select Deploy Cluster to begin the cluster creation process.
The cluster creation process takes approximately 30 to 45 minutes to complete. You can monitor the cluster's progress by navigating to the left main menu and selecting Cluster > Overview. The cluster is fully provisioned when the status changes to Running and the health status is Healthy.
Validate
-
Open Local UI on the same host you used in Enablement (your only appliance for single-node, or the leader for three-node).
-
Verify the cluster is running and the health status is Healthy. Download the kubeconfig file for the cluster.
-
Set the
KUBECONFIGenvironment variable to the path of the kubeconfig file sokubectlcan access the cluster.export KUBECONFIG=path/to/kubeconfig -
Check that all pods are in the Running state.
kubectl get pods --all-namespaces -
Confirm you can access the following components. Replace
<domain-or-vip-address>with the domain or VIP you configured for the cluster.-
Palette system console -
https://<domain-or-vip-address>/system. -
Palette -
https://<domain-or-vip-address>. -
PaletteAI -
https://<domain-or-vip-address>/ai.
-
Advanced Configuration
Out of the box, the PaletteAI installer deploys the PaletteAI Helm chart with sensible default values. However, you can customize the deployment by editing the values.yaml file that is used by the installer. A copy of the file is located on each node in the cluster, under /usr/local/palette-ai/values.yaml.
How the Installer Merges Values
The values.yaml file on the host is not the final set of values passed to Helm. The placeholder strings in the default values.yaml file — such as replace.with.your.domain — are replaced automatically by the installer. You do not need to update them manually.
The merged values are never written back to the values.yaml file on the host. The file retains your edits between CronJob runs, and the installer merges your edits with the installer-managed values on every run.
Each time the PaletteAI installer CronJob runs, it constructs the final values by merging three layers in the following order, where later layers take priority over earlier ones:
-
Your
values.yamlfile on the host (lowest priority) -
Runtime-generated values: domain-derived configuration (DNS, Dex, Canvas, metrics URLs), auto-generated credentials (Alertmanager, Dex client secrets, Prometheus auth), and OCI registry settings. These are derived from the settings you provided in Local UI, such as the root domain.
-
System-enforced overrides hardcoded in the installer — primarily component enable/disable flags and the deployment mode (highest priority)
Installer-Managed Fields
The following fields are set or overridden by the installer. Edits to these fields in values.yaml have no effect.
Fields marked with an asterisk (*) are only overridden when a root domain is configured in Local UI. Fields marked with a dagger (†) are only overridden under specific conditions described in the table; they remain customizable otherwise.
| Field | Value Set by Installer |
|---|---|
global.featureFlags.versioningType | Always semantic |
global.featureFlags.deploymentMode | connected or airgap, determined by the installer |
global.dns.domain | Your root domain from Local UI * |
global.dns.rootIngress.enabled | Always false |
global.metrics.grafanaUrl | Derived from root domain * |
global.metrics.prometheusBaseUrl | Derived from root domain * |
global.metrics.username | Auto-generated Prometheus credential * |
global.metrics.password | Auto-generated Prometheus credential * |
global.auditLogging.basicAuth.username | Auto-generated Alertmanager credential |
global.auditLogging.basicAuth.password | Auto-generated Alertmanager credential |
ingress-nginx.enabled | Always false |
traefik.enabled | Always false |
cert-manager.enabled | Always false |
flux2.enabled | Always false |
zot.enabled | Always false |
brush.certManager.enabled | Always false |
brush.mural.source | Internal Zot registry settings (airgap mode only) |
brush.muralCrds.source | Internal Zot registry settings (airgap mode only) |
fleetConfig.enabled | Always true |
fleetConfig.hub.apiServer | https://<root-domain>:6443 * |
fleetConfig.spokeValuesOverrides | Auto-generated spoke configuration |
fleetConfig.spokes[0].ociRegistry | Internal Zot registry settings (airgap mode only) |
hue.ociRegistry | Internal Zot registry settings (airgap mode only) |
canvas.ingress.enabled | Always true |
canvas.ingress.matchAllHosts | Always true |
canvas.enableHTTP | Always true |
canvas.oidc.redirectURL | https://<root-domain>/ai/callback * |
dex.ingress.enabled | Always false |
dex.config.issuer | https://<root-domain>/dex * |
dex.config.staticClients | Auto-generated Dex client configuration * |
dex.config.staticPasswords † | Cleared when Disable Static Dex Users is enabled |
alertmanager.livenessProbe.httpGet.httpHeaders | Auto-generated Alertmanager auth header |
alertmanager.readinessProbe.httpGet.httpHeaders | Auto-generated Alertmanager auth header |
Customize Values
Any field not listed in the Installer-Managed Fields table is customizable, and edits to those fields are preserved across installer runs. This section walks through the values.yaml sections that most installations customize. Refer to the Helm Chart Configuration for the complete list of available options.
Global
Use the global section to configure overarching settings for the PaletteAI deployment. When you install PaletteAI with the PaletteAI appliance, the installer sets most global values from the root domain you configure in Local UI. Refer to Installer-Managed Fields for the authoritative list.
-
The installer sets
global.dns.domainfrom the root domain you configure in Local UI. You do not need to edit this field. -
To secure the Alertmanager instance that receives audit events, the installer auto-generates
global.auditLogging.basicAuth.usernameandglobal.auditLogging.basicAuth.password. You do not need to edit these fields.Refer to Audit Logging to learn more about configuring audit logging, querying audit events, and forwarding logs to long-term storage.
-
The PaletteAI appliance deploys a Prometheus server to the hub cluster. Spoke clusters use Prometheus agents to collect metrics and ship them to the Prometheus server via
remote_write. The installer derivesglobal.metrics.prometheusBaseUrlfrom the root domain and auto-generates theusernameandpassword, so you do not need to edit these fields.The remaining
global.metricsfields are customizable. You typically need to changeglobal.metrics.agentTypeto adjust which metrics the spoke clusters ship.global:
metrics:
prometheusBaseUrl: 'http://example.acme.org/prometheus' # Installer-managed
timeout: '5s'
scrapeInterval: '15s'
agentType: 'prometheus-agent-minimal'
username: '' # Installer-managed
password: '' # Installer-managedBy default,
global.metrics.agentTypeis set toprometheus-agent-minimal. The minimal agent configuration only collects spoke cluster CPU and GPU utilization metrics. You may changeglobal.metrics.agentTypetoprometheus-agentto ship all node-exporter and dcgm-exporter metrics from spoke clusters for comprehensive observability.Refer to Configure Prometheus Agent Monitoring for guidance on agent types, GPU metrics, and the Grafana dashboard link.
Dex
Dex is the primary customization point for most installations. The installer manages dex.config.issuer, dex.config.staticClients, and dex.ingress.enabled, so you configure identity providers and local users without touching those fields.
-
Configure identity providers. Set
dex.config.connectorsto one or more upstream providers such as OIDC, SAML, or LDAP. Refer to the Dex connectors documentation for provider-specific configuration.Example AWS Cognito OIDC connectordex:
config:
connectors:
- type: oidc
id: aws
name: AWS Cognito
config:
issuer: https://cognito-idp.us-east-1.amazonaws.com/us-east-1_xxxxxx
clientID: xxxxxxxxxxxxxxx
clientSecret: xxxxxxxxxxxxxxxxx
redirectURI: https://<your-domain>/dex/callback
getUserInfo: true
userNameKey: email
scopes:
- openid
- email
- profile -
Configure local users.
dex.config.staticPasswordsdefines local user credentials, including the default admin user. The default admin user isadmin@example.comwith the passwordpassword. Change these values before installation.Example local Dex userdex:
config:
staticPasswords:
- email: '<admin-email>'
hash: '<bcrypt-password-hash>'
username: 'admin'
userID: '08a8684b-db88-4b73-90a9-3cd1661f5466'The
hashvalue must be a bcrypt hash of the desired password, and theuserIDcan be any unique string. The installer only managesdex.config.staticPasswordswhen the Disable Static Dex Users toggle in Local UI is enabled. Refer to Local Dex Users for customization paths and operational guidance.warningIf you do not configure any Dex connectors, you must enable Dex local users before installation so users can access PaletteAI. When you select Enable Dex local users in Local UI, the installer automatically configures the default admin local user,
admin@example.com/password. You can also add your own users underdex.config.staticPasswords.If Dex local users are disabled, configure at least one Dex connector under
dex.config.connectors. Local Dex users inherit the Canvas service account's permissions unless you enable User Impersonation.
Canvas
The installer manages Canvas ingress settings and the OIDC redirect URL. You can customize other Canvas settings, such as resource requests and limits, replica counts, and user impersonation.
To enable user impersonation, configure canvas.impersonationProxy. The following example maps the local Dex admin user to the Kubernetes admin group.
canvas:
  impersonationProxy:
    enabled: true
    userMode: 'passthrough'
    groupsMode: 'map'
    dexGroupMap:
      'admin@example.com': ['admin']
Refer to Configure User Impersonation for more examples and details on OIDC group mapping.
Alertmanager
The installer manages the Base64-encoded Authorization header in alertmanager.livenessProbe and alertmanager.readinessProbe, along with the matching global.auditLogging.basicAuth credentials. Routing, receivers, persistence, and other Alertmanager configuration are customizable.
Refer to Audit Logging for guidance on configuring receivers, querying audit events, and forwarding events to long-term storage.
Fleet Config
By default, the appliance deploys with the hub-as-spoke pattern. The installer sets fleetConfig.enabled, fleetConfig.hub.apiServer, and fleetConfig.spokeValuesOverrides.
If you need to attach dedicated spoke clusters, customize fleetConfig.spokes to add an entry for each spoke. Each spoke entry requires a name and a kubeconfig reference — either inCluster: true for the hub-as-spoke, or a reference to a Kubernetes Secret that contains the kubeconfig for a remote spoke.
fleetConfig:
  spokes:
    - name: spoke-1
      kubeconfig:
        inCluster: false
        secretReference:
          name: 'spoke-kubeconfig-1'
          kubeconfigKey: 'kubeconfig'
Configure Values Before Initial Installation
To customize values before PaletteAI is installed for the first time, use the Enable Values Node Selector option to pause the installer until you have finished editing the file.
-
In the Local UI, toggle the Enable Values Node Selector option on. This prevents the PaletteAI installer from being scheduled until a node with the label
palette.ai/helm-config: "true"is found.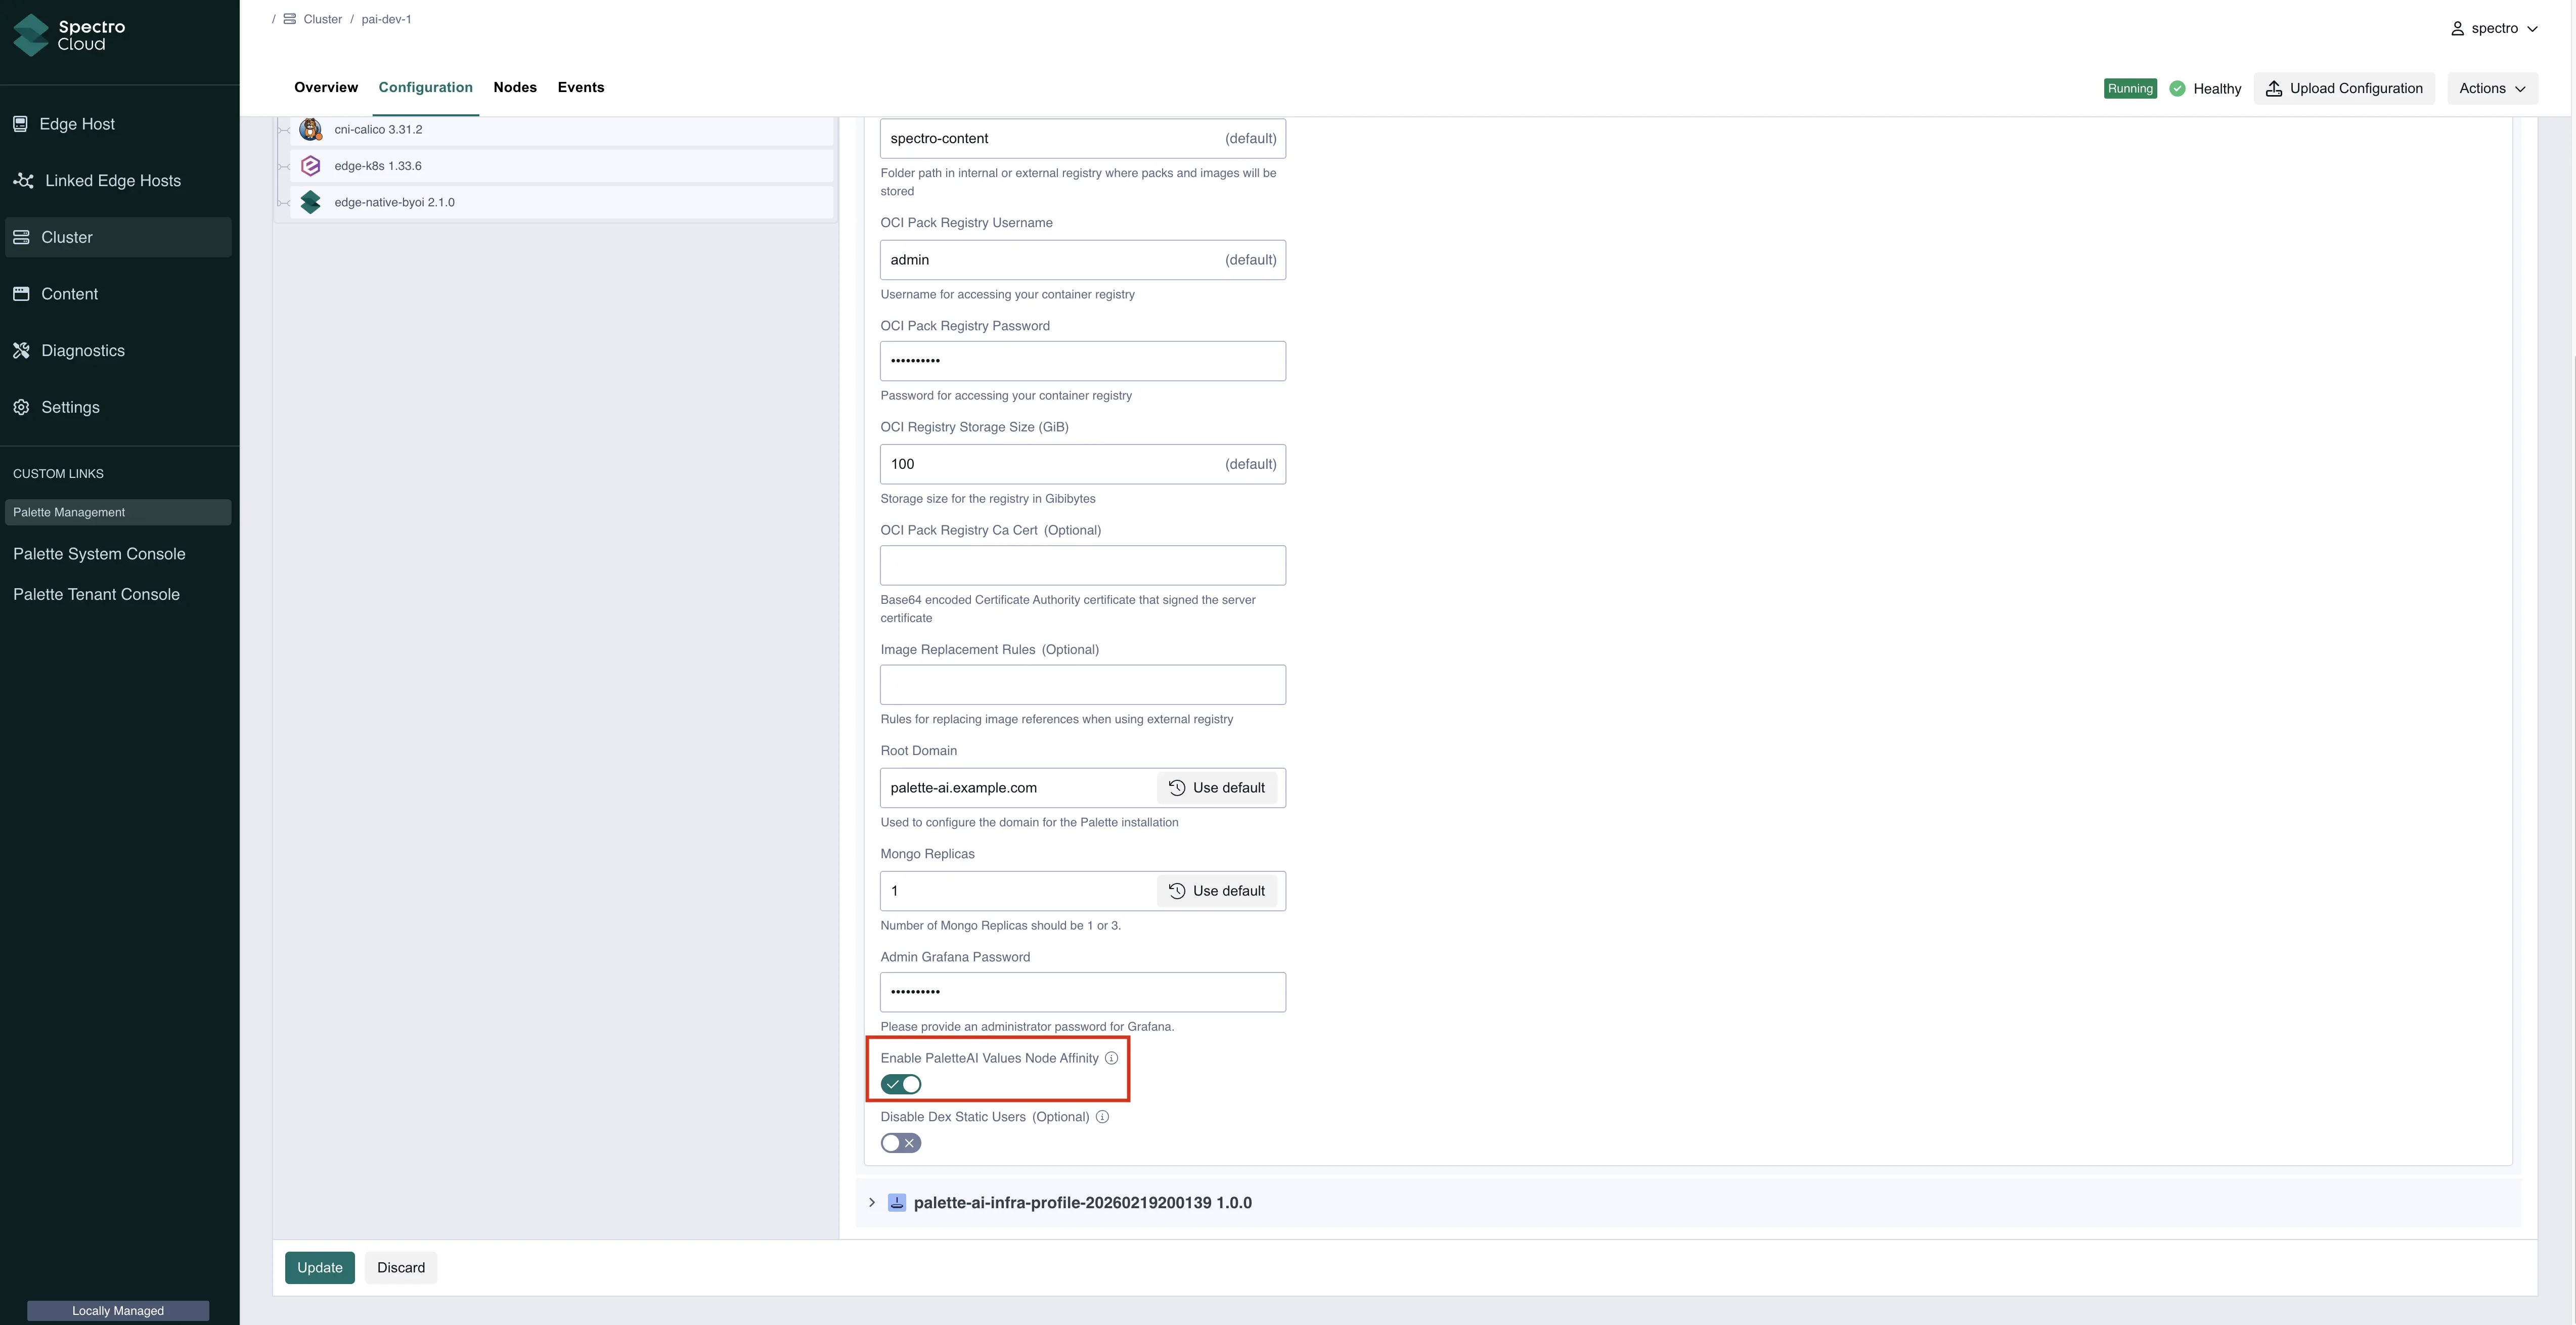
-
Choose the node that you want to use for configuring the values. This is the node whose
values.yamlfile you modify, and where the PaletteAI installer is scheduled. Make note of the node's hostname. -
SSH into the node.
ssh <username>@<node-hostname> -
Modify the
values.yamlfile to your desired configuration. Refer to the Helm Chart Configuration for more information on the available options. Save the file and exit the editor.sudo vi /usr/local/palette-ai/values.yaml -
From a shell with
kubectlaccess to the appliance cluster, label the same node where you edited thevalues.yamlfile with the labelpalette.ai/helm-config: "true".kubectl label node <node-hostname> palette.ai/helm-config=truewarningIn a multi-node cluster, ensure that only one node is labeled with
palette.ai/helm-config: "true". If multiple nodes are labeled, the PaletteAI installer pod may be scheduled on different nodes every time it runs, causing inconsistencies in the installation.
After you label the node, the PaletteAI installer pod transitions from the Pending state to the Running state.
Update Values After Installation
To change customizable values after PaletteAI is installed, SSH into the node and edit the values.yaml file directly. The installer CronJob runs every five minutes and applies your changes on the next run.
The values.yaml file on the host is never updated with the merged values. It always contains only what you have written to it. The installer merges your file with the installer-managed values in memory on each run.
-
SSH into the node where the
values.yamlfile is located.ssh <username>@<node-hostname> -
Edit the
values.yamlfile with your changes. Only modify fields that are not listed in the Installer-Managed Fields table. Save the file and exit the editor.sudo vi /usr/local/palette-ai/values.yaml
Next Steps
Once Palette and PaletteAI are installed on your new cluster, you must integrate Palette with PaletteAI using PaletteAI's Settings resource. This resource requires a Palette tenant, project, and API key to communicate with Palette and deploy artificial intelligence and machine learning (AI/ML) applications to the appropriate location.
Proceed to the Integrate with Palette guide to learn how to prepare your Palette environment.